Warning: preg_replace(): The /e modifier is deprecated, use preg_replace_callback instead in ..../includes/class_bbcode.php on line 2958

Warning: preg_replace(): The /e modifier is deprecated, use preg_replace_callback instead in ..../includes/class_bbcode.php on line 2958

Warning: preg_replace(): The /e modifier is deprecated, use preg_replace_callback instead in ..../includes/class_bbcode.php on line 2958

Warning: preg_replace(): The /e modifier is deprecated, use preg_replace_callback instead in ..../includes/class_bbcode.php on line 2958

Warning: preg_replace(): The /e modifier is deprecated, use preg_replace_callback instead in ..../includes/class_bbcode.php on line 2958

Warning: preg_replace(): The /e modifier is deprecated, use preg_replace_callback instead in ..../includes/class_bbcode.php on line 2958

Warning: preg_replace(): The /e modifier is deprecated, use preg_replace_callback instead in ..../includes/class_bbcode.php on line 2958

Warning: preg_replace(): The /e modifier is deprecated, use preg_replace_callback instead in ..../includes/class_bbcode.php on line 2958

Warning: preg_replace(): The /e modifier is deprecated, use preg_replace_callback instead in ..../includes/class_bbcode.php on line 2958

Warning: preg_replace(): The /e modifier is deprecated, use preg_replace_callback instead in ..../includes/class_bbcode.php on line 2958

Warning: preg_replace(): The /e modifier is deprecated, use preg_replace_callback instead in ..../includes/class_bbcode.php on line 2958

Warning: preg_replace(): The /e modifier is deprecated, use preg_replace_callback instead in ..../includes/class_bbcode.php on line 2958
Yamaha shredder to hardtail dee-construction - Blogs - Guitar Discussion Forum - The Fret
View RSS Feed

Dee's guitar-making/modding projects blog

Yamaha shredder to hardtail dee-construction

Rate this Entry
I got bored with the Floyd on my Yamaha...and the guitar needs a complete work-over anyway...so I ordered a Gibson-style wraparound-bridge and I'll do the Davette thing on the axe...rip out the Floyd, carve a large opening in its place and glue in a big block of new wood...plane it nice and install a fixed bridge. Sand down and slightly V-shapify the neck, re-shape the headstock, sand and re-finish the entire body. Actually cover the front entirely with aluminum.

Heres' what happens:

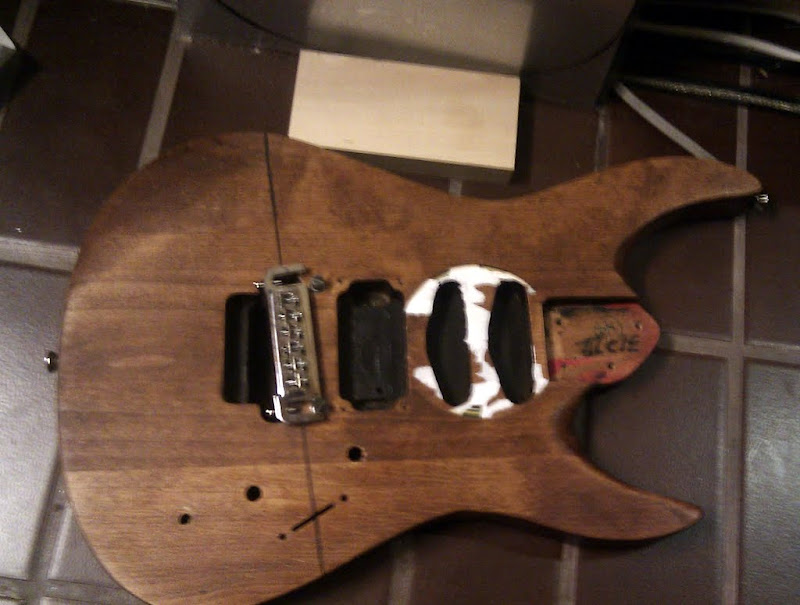
Here's some progress info:


Got everything taken apart, drew outlines to the aluminum sheet & got the router sorted...so all that remains now is to start working! I'll first have to route the cavity for the wood block (in the picture; I'll make it smaller first tho) and then glue it in and await a day or two...then saw and shape the aluminum & glue that on and again wait a few days...and meanwhile need to go over the neck. Already gave it a slight fret job and cleansed and oiled the fretboard nice. Next ripping off the lacquer and reshaping it gently.
Tags: None Add / Edit Tags
Categories
Uncategorized

Comments

  1. deeaa's Avatar
    The bridge is off a B.C. Rich guitar, wraparound style.

    Here's the headstock between coats and sanding:


    And here's the neck sanded to perfection, awaiting nitro lacquer now!:


    Next up, gonna do the routing for the bridge block...post when it's done!
  2. deeaa's Avatar
    Actually only had the time to remove the trem inserts from the body the help of sturdy locking pliers, and then I concentrated on the neck again...NOW it's ready for nitro.


    Here you might be able to see what I did to the neck; it was a very slim and fast taper to begin with, but I gave it a slight V shape especially on the area where the thumb rests. i.e. thinned the edge of the fretboard, now the slope starts right after the fret ends and before getting to the maple part already, allowing the thumb to be really close to the low E string when played, which is how I like it because that's where my thumb always rests when playing.

    This time I also really had to do it that way, because there were a couple of pretty deep gouges in the neck, looking like something had dropped on the neck while playing, like a sharp bolt from a mic stand falling over the player. Now those are gone too!

    The neck is incredibly straight for being over 20 years old, so it made a perfect victim for my use - not very likely to warp any more :-) I much prefer getting an old neck to rework, rather than make a new one just for that reason...it'll last forever if it has already taken 20 years easily.

    Oh yeah, this is how the guitar looked like for a year in my use, when I was pondering what to do with it...


    And now I think the headstock is smooth enough for nitro to be layered.

    This time, I'm letting my friend the luthier do the spraying, because a.) he charges almost the same as buying a nitro can would b.) I don't have a good warm space to spray in, it's effin' cold in the garage now that it's winter...I'm sanding and building the thing in -14 degrees there...not the best place for spraying nitro. The only bad thing about is it'll take at least a few weeks now for me to get the neck to him, then for him to have a slot to do it, and then dry and get it back to me...well will give me time to work on the body.

    Then it's just a slight recrowning of the pretty flat-ground jumbo frets and it'll be done for the neck part.
  3. deeaa's Avatar
    Here's the body with the block glued in...let it stay a few days to really get glued tight, and then I'm gonna glue the aluminum top on, using a 2-component special glue that hardens to a very hard material that should work well acoustically as well, not dampen the body vibrations any more than necessary, hopefully. Will need to be careful to apply just the thinnest possible layer of the stuff, too, yet make sure there aren't spots where the aluminum is loose from the surface and could 'rattle'.


    Also cut some experimental aluminum truss rod covers already, just hand-filed.
  4. deeaa's Avatar


    The boys 'help' while I'm gluing on the aluminum top...will be VERY interesting to see how this works out...might need some hammering and applying glue to certain parts where the edge of the guitar is contoured pretty heavily...this is very interesting to work on indeed.
  5. deeaa's Avatar
    Here it is with the aluminum top on...looks good so far. Now I have to figure out how to cut the holes and smooth the edges...

  6. deeaa's Avatar


    Okay, got the aluminum top pretty much shaped...and the neck pocket and picup routing done too, next step is to install the bridge studs. Here's a 'first' parts layout test...starting to look like a guitar!

    There's gonna be a LOT of sanding and treating the backside...haven't decided on its finish yet, been toying of the idea of using aluminum paint on the back and sides for a rather uniform look. Or black, and even stained wood is an option...but I fear I can't get the sanded aluminum/body joint so even and neat that way, color would cover the transition between the layers well.
  7. deeaa's Avatar
    Meanwhile did the covers for the back...


    Here you can also see the 'trem' system on the guitar...I have the same setup on my Davette...despite it's a hardtail I've installed some tensioned trem springs inside, and you can clearly hear they're there when playing acoustically...not really audible when played amplified, but since the Davette has 'em and this is to be it's mean li'l brother, I put them on this one too. Just cutting the back sheets from aluminum here.
  8. deeaa's Avatar


    Nearng completion...gave it some FX paint...
  9. deeaa's Avatar
    Here's the body finished now, electrics soldered and all...man, the nitro lacquer is SLOW to dry...can't wait to get to installing it!


    And here's the backside; made all the plates etc. anew with the same aluminum as the front:

  10. deeaa's Avatar
    Finished!!!

    Just some more fine tuning to do; intonation that is is a tad off. But, other than that, plays just like it used to, or actually a little better. Very light, balance is perfect, action can be set lower than I'd ever want it to be. Not yet tested with a good amp but initial tests show a very nice sound and lots of sustain.


  11. deeaa's Avatar


  12. Eric's Avatar
    That's very cool! I forgot you were going to do it with aluminum. And yes, I rarely if ever look at the blogs here. They're just not really linked to the forum posts for everyday use, so I forget about them.
  13. marnold's Avatar
    Is that paint on the aluminum or something else?
  14. deeaa's Avatar
    It's paint....just black paint, applied with a dry brush.

    Still haven't played it in practice...eager to do so soon!
  15. Katastrophe's Avatar
    It's really cool how you smoothed out the edges with the aluminum. Looks awesome, Dee!
  16. deeaa's Avatar
    OH MAN

    I really like how this sounds.

    Basically, it sounds just like any of my guitars, BUT there is this incredible sustain to it, and it's accompanied by a very very good clarity of chords. Hard or impossible to describe, but the guitar really does both scream like a mutha and also provides very very clear chords at nicely gainy sounds too. You know, you can hit a 6-string chord and pick individual sounds over that and everything is clear despite plenty of gain. It's very similar to the 'Davette' I built years back with the exact same princples but without the aluminum top, which may be the source of that crazy sustain, I'm not sure. But the Davette is similarly very clear-sounding even with plenty of gain.

    I wish I had recorded this with something better than the cam's crappy mic---but anyway here's a clip of it in the action.