Warning: preg_replace(): The /e modifier is deprecated, use preg_replace_callback instead in ..../includes/class_bbcode.php on line 2958

Warning: preg_replace(): The /e modifier is deprecated, use preg_replace_callback instead in ..../includes/class_bbcode.php on line 2958

Warning: preg_replace(): The /e modifier is deprecated, use preg_replace_callback instead in ..../includes/class_bbcode.php on line 2958

Warning: preg_replace(): The /e modifier is deprecated, use preg_replace_callback instead in ..../includes/class_bbcode.php on line 2958

Warning: preg_replace(): The /e modifier is deprecated, use preg_replace_callback instead in ..../includes/class_bbcode.php on line 2958

Warning: preg_replace(): The /e modifier is deprecated, use preg_replace_callback instead in ..../includes/class_bbcode.php on line 2958
Installing Sustainiac in Strat.. trials, tribulations, pictures
Page 1 of 2 12 LastLast
Results 1 to 19 of 35

Thread: Installing Sustainiac in Strat.. trials, tribulations, pictures

  1. #1
    Join Date
    Jun 2007
    Posts
    396
    Post Thanks / Like

    Default Installing Sustainiac in Strat.. pictures/FINSIHED-sound clip

    I started this one in another forum I frequent last night, figured maybe I would transfer it over here as I think it might help someone in the future thinking of doing the same kind of thing.
    Last edited by 333maxwell; March 15th, 2010 at 11:05 AM.

  2. #2
    Join Date
    Jun 2007
    Posts
    396
    Post Thanks / Like

    Default

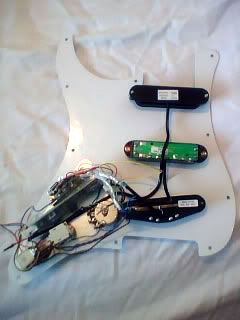
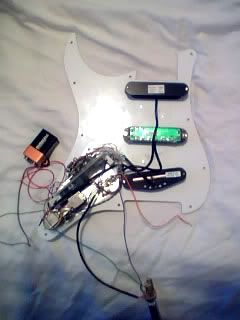
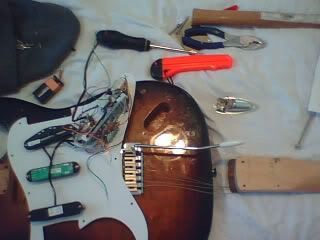
    I'm wiring up a sustainiac in a Strat.. I really can hardly focus because I don't feel very well and anyways, I decided to start, got a good way through (mind you it calls for the incorporation of 18 additional wires, a circuit board and two additional push pull pots in lieu of the original wiring for a Strat, so this is fairly complex and 'tight' to fit it all in..

    Just about finished her up in fact.. and then it downed on me.. hit me like a ton of Bricks.. Seymours (for straight humbucker) uses BLACK for a HOT and I had wired it up Green.. I mean I had to pull the hots off to get to the pup in the first place.. there would of been no doubt even if someone didn't know seymour.. it was a stupid stupid oops..

    This means all my grounds are long and all my hots are now too short..

    And I knew this.. I have wired so many it isn't even funny.

    It was kind of funny too.. I was doing a google search just to make sure after it dawned on me.. in some kind of vain hope they had changed more than a quarter century of wiring code to suit my stupidity..

    ---

    Soooo.. I've put it away.. tomorrow will pull all the pup wiring, rewire the pup leads and then the guitar again..

    Nothing like turning what they call a 4-10 hour job into a 3 hour 'fix my own screw up' session..

    ---

    Still.. all that said.. what the hell was Seymour thinking..

    Black is never ever ever ever ever hot.. it just isn't.. it is a time honored tradition that black is earth..

    If I wasn't laughing so hard right now, I think I would cry. Confused

  3. #3
    Join Date
    Jun 2007
    Posts
    396
    Post Thanks / Like

    Default

    Quote Originally Posted by Mr. Marty
    Quote Originally Posted by 333maxwell
    I'm wiring up a satanic Strat..:?
    :shocked:
    Shall I call a preist?
    It's worse than Satan..

    I got my lovely bride to snap a pic (you need to learn to use your own f'kin phone mr, she tells me)...


    This isn't really a very good shot.. but amongst my other hassles, the cat thought it would help at the last minute.

    Basically I remove the circuit board, and re-wire over half of what I have already done AFTER repairing the existing pup wires..


    Grrrrrrrr

  4. #4
    Join Date
    Jun 2007
    Posts
    396
    Post Thanks / Like

    Default

    Woo hoo..

    I know someone may be watching, sooner or later someone may wonder what it is like to install one of these things.. , so to update I just finished all the basic internal wiring and am getting ready for the big task of soldering 13 new grounds to a volume pot.. anyone who has tried to solder just one to the case of a pot knows it can be a bit nasty to do more than 1.. I may melt the pickguard before I get it hot enough for the solder to take.. *L*

    From there it is mostly try it out pre final installation.

    Here is the guard now, looks much like yesterday, but it is not..

    The remaining non ground wires are battery and input Jack which will get directed though the body upon final installation.

    The funny thing is, I know in a few hours I will test this, and it wont work.. some tiny small thing.. but where do you start looking.. *L*


  5. #5
    Join Date
    Jun 2007
    Posts
    396
    Post Thanks / Like

    Default

    Testing Testing, 1-2-3-

    No turning back now..

    All ready to hook up that battery and get my lil soul crushed when it doesn't work..

    Nothing left to do but cross the fingers.,,. and if it works, how the hell to get it all stuffed into the unmodified cavity..

    I'll know soon enough.. just going to go grab a bite to eat (finally up to full solid foods.. ) and come back and get ready to cry..


  6. #6
    Join Date
    Jun 2007
    Posts
    396
    Post Thanks / Like

    Default

    The initial electronics check out fine.. I can't test the driver until I get it put together.

    I went to stick it in the designated body, which is a lovely piece of wood and it is way too shallow. I try both a Squire and American Standard body, neither has deep enough routes.

    And this boys and girls is why the invented hammers and screw drivers (it's only wood right? Only Strat right?)

    So I've spent the last hour whittling with nothing but a screwdriver and hammer on a body I hadn't intended on using, but I am not about to start chopping up my really nice body, I'll rebuild a nice guitar out of it with the parts from the others.. a few whacks of wood from the insides wont matter at all on this one..

    You can't tell by the pic, but probably an inch deep all the way around I had to go.


    Of course the new body means I have to rebuild the rem as I just put a nice sustainer block on the other and took the nicest saddles from sevreal parts projects and incorpporated them etc.. but that was for a 6 screw trem, and the new one will have to be a 2 pt trem which means rebuilding the whole bridge, finding the neck that fits in this one etc..

    Hopefully that will go all rather quickly..

  7. #7
    Join Date
    Jun 2007
    Posts
    396
    Post Thanks / Like

    Default

    Starting to look like a Strat again..

    I still have no way of knowing if the driver is going to work, or if I have to crank up the amplification which can only be done INSIDE the damn pickguard, and the only way to find out is to string her up.

    Obviously I have a bit of work to do still..


    Need to use my fancy hammer and screwdriver to whack about a 1/4 inch battery sized piece out of the trem back for the battery.. very simple little thing.. although I can test drive the guitar before I do this.

    Also need to rebuild the trem which I am going to do now, and I have to find the right neck.. I may go with the Strat neck I scalloped, or likely if the big Fender headstock Squire 22 fret neck will fit on this one I may go that way.. either way I have to strip off the prime machine heads to put them on whatever neck I am using..

    From there it will be put it together and test the driver, if it is adequate then I do a neck setup etc.. and hopefully by this time tomorrow night I have a fully functioning WTF guitar.. likely some quick soundclips just for fun, although with cotton stuck in both my ears it wont be anything but a quick demo to say 'did it'.

    I am eager to finish and assess the project and illustrate the things that might make the project a bit easier for the next guy should he have the cajones to try something like this.. It's nothing like swapping a pup.

    My biggest hangup is I didn't realize how bad my eyes had become.. this is a very tight space with some very minute pieces and intense soldering and the eyes.. oh the poor eyes..

  8. #8
    Join Date
    Oct 2005
    Posts
    7,254
    Post Thanks / Like

    Default

    Poor Max. What prompted the sudden urge for a Sustainiac in the first place? Should be a cool project once it's all done--assuming you aren't driven mad first
    Axen: Jackson DK2M, Fender Deluxe Nashville Telecaster, Reverend Warhawk 390, Taylor 914ce, ESP LTD Surveyor-414
    Amphen: Jet City JCA22H and JCA12S cab, Carvin X-60 combo, Acoustic B20
    Effecten: "Thesis 96" Overdrive/Boost (aka DVM OD2), Hardwire DL-8 Digital Delay/Looper, DigiTech Polara Reverb, DigiTech EX-7 Expression Factory and CF-7 Chorus Factory, Danelectro CF-1 Cool Cat Fuzz
    "I wish Imagine Dragons would be stuck in an Arcade Fire for an entire Vampire Weekend."--Brian Posehn

  9. #9
    Join Date
    Jun 2008
    Location
    Down Under
    Posts
    1,706
    Post Thanks / Like

    Default

    Wow dude!

    I'll admit I had to look up what a "sustainiac" was because my assumption was you were just stuffing a gain circuit inside your guitar. A practice that usually underwhelms me frankly.

    But woahhhh, this is something entirely different altogether!

    I'm quite keen to hear how this turns out so thanks for the cross-posting!

    (just quietly I'm thinking this might be a great project to try on the next junker that takes my eye.....)

    Also, hammer and screwdriver? I'm assuming you aren't a cabinet maker by trade huh.

  10. #10
    Join Date
    Jun 2007
    Posts
    396
    Post Thanks / Like

    Default

    Quote Originally Posted by marnold
    Poor Max. What prompted the sudden urge for a Sustainiac in the first place? Should be a cool project once it's all done--assuming you aren't driven mad first

    Heya Marnold..

    It was a no brainer for me.. I love a live guitar..

    Especially now that I play mostly modelers and record exclusively, the sustainer is as close to live as one will ever get..

    That and I just really felt like punishing myself! *G*

  11. #11
    Join Date
    Jun 2007
    Posts
    396
    Post Thanks / Like

    Default

    Quote Originally Posted by Ch0jin
    Wow dude!

    I'll admit I had to look up what a "sustainiac" was because my assumption was you were just stuffing a gain circuit inside your guitar. A practice that usually underwhelms me frankly.

    But woahhhh, this is something entirely different altogether!

    I'm quite keen to hear how this turns out so thanks for the cross-posting!

    (just quietly I'm thinking this might be a great project to try on the next junker that takes my eye.....)

    Also, hammer and screwdriver? I'm assuming you aren't a cabinet maker by trade huh.
    No cabinet maker here.. I have chisels somewhere.. it was quicker to 'ust do it' and get it done.. I am no stranger to taking sharp objects to my guitars.. *G*

    Yes, I'll keep it updated as I go, glad you are digging on it..

  12. #12
    Join Date
    Jun 2007
    Posts
    396
    Post Thanks / Like

    Default

    Midnight..

    All dressed up and nowhere to go..

    Neck on, strings on.. everything is well enough to see if the driver works, but I am finished for the night. When it doesn't work or needs adjusted I know I would stay up and mess with it, so I am putting it away till morning.

    Neck fit in body, strings are centered enough, but unless I can tap the grommets down on the two pt trem I will have to shim the neck oh so slightly as the action is set as low as possible and just a tad too high even for me (I love a good high action set up correctly).. hopefully the grommets will afford me to tap them in about a 16th inch deep or more to give me some setup room.. if not, that's where the shim will come in.. as I need just the thinnest of shim I have found the trimmed ends of sax reeds work pretty well for precise adjustments.

    By morning it should all start to come together really quickly, or fight me tooth and nail.

  13. #13
    Join Date
    Jun 2007
    Posts
    396
    Post Thanks / Like

    Default

    Put her all together, plugged her in, all the pups work, everything works EXCEPT the driver it's self (with this kind of wiring indicating there is something very simple going on, as everything is related to the other like old Christmas tree lights, one goes down, they all do).. I know the power works because the active pup is functioning fine.

    I looked at my own diagrams and those provided by sustainiac and I think the issue lay in getting one earth wire screwed up.. but I will only know after I strip her down and take the strings back off etc etc..

    I know from doing this kind of thing before, where I may have to go in again to the pick guard, the best way to do it is to just loosen the strings and remove the neck each time.. this is the beauty of the bolt on neck.. 4 screws save me a whole lot of headache putting either new strings, or trying to string bent ones through the sustain block, on each time.. takes a 30 minute total job down to about 10..

    I figure in about an hour I will be in, and if I am right corrected, and put back together and strung up enough to know if she is working..

    From there it is going to need a good deal of setup work.. I was able to tap down the grommets enough to get the action setup-able to where I am really going to like this neck/body. (I think)..

    But that's putting the cart before the horse, aint it.

  14. #14
    Join Date
    Jun 2007
    Posts
    396
    Post Thanks / Like

    Default

    Just like starting over..


    Everything visually checks out to be exact to diagram..

    I went and got a huge lighted magnifying glass just now, so I am going to dig in deep deep deep..

    If it is a wiring issue I'll get it fixed easy enough..

    My only concern is I read a story about a guy installing one of these, going through exactly what I did.. and he kept ripping it down, re-doing everything.. finally tossed hands up in frustration and sent the whole thing to the manufacturer, and they sent it back with 'sorry' the original driver was no good..

    Wouldn't THAT be funny..

    I'm pretty certain it is a wiring oversight on my part.. .. I'll know in a bit.

  15. #15
    Join Date
    Jun 2007
    Posts
    396
    Post Thanks / Like

    Default

    A whole new ballgame..

    The wiring is spec.. perfect if I do say so myself..

    Only a few things it can possibly be..

    1. Bad pull pot's (did some of the internal plastic pieces melt while soldering? Been known to happen, even when not soldering the pull base.

    2. Blown resistor (I'll check it's values)

    3. A bad circuit board (unlikely)

    4. Bad Driver.. (I read it has happened, still, likely this is something very silly and small and (time consuming) it's always the little things.

    Sooo..

    I couldn't find any of my multimeters (when you have kids.. older and younger).. so I went and bought one at Wally World.. that is always a wrestle for me, to get in and out of that place.. when I got home, relaxed, pulled it out of the plastic, it was broken.. it's an analog one and the needle was just sitting there.. it never made it to the axle at the factory. *L*

    SOOOO back to Wally World, this time I got a bit better multimeter just because I wanted to act angry at Walmart.. although it wasn't an act..

    ---

    So now I will bust her down again, pull the plate, re-solder all the connections OUTSIDE of the guitar, and go to town checking resistance and tolerance levels, making sure the pots, caps, resisters and connections are solid..

    Trace the power to and from the driver etc..

    More than I wanted to do, but exactly what I figured would happen.

    So here I go..

  16. #16
    Join Date
    Jun 2007
    Posts
    396
    Post Thanks / Like

    Default

    Last night..

    Finished by actually getting some sustain from the driver (wheeee) however ONLY when the volume is DOWN.

    Been hitching with Alan Hoover who invented the thing.. he has been supportive, answers every question right away, suggests checkpoint.. yet I know he has to be getting this daily so he is likely as frustrated as I am.

    They recommend they install these things, so I know he has to be cringing about now. Yet, a very patient man.

    ---

    This morning I will strip the guitar entirely again, check the volume and harmonic gain circuit.. it has to be in there somewhere.. at least I know the driver and board work.. so that's a VERY good thing.

    I've either done something, or there is still s chance the harmonic gain control pot, or passive volume pot are bad, but more likely I have a cold solder joint going on somewhere.

    I don't mind starting over as everyone is gone today from the house for the first time since I started this project, and without an 8 yr old dancing on my wires and telling me 'hey dad, look' every 5 minutes, and an ol lady 'cleaning up' after me (putting the entire work away and in neat little boxes to hold screws and stuff (I love her dearly, and I just smile and say thanks, but keep yer fkin hands off my project woman.. wonderful girl, she just wants to be a part of this.. it has taken a lot of time away from her and the family the last few days, yet she left this morning with a complimentary kiss and a 'I'll be anxious to hear how you fixed it' this morning.. still.. keep yer mits off my electronics, thats confusing to find your recently soldered pickguard all bundled up in a box.. *L*)..

    So I have had a run of bad luck on this, yet good luck at the same time with it 'trying' to work.. which is better than dead and lifeless..

    Beat goes on..

    More soon..

    ----

    The ONE conclusion I have made, is if you are one of those 'time is money' people (I certainly wouldn't of had this kind of time luxury in my younger days) it might behoove one to have the Maniac Music (The guy who invented this) people install it.. they start around 150 an installation, but as you can see, If I was making 10 bucks an hour (for example) I would be around that at this point.. well.. not quite.. but close enough to consider the financial implications of having it installed correctly by someone else, done right the first time..

    However this whole exersize is to SHOW a regular guy doing it, so I am actually quite pleased up to this point.. sketchy results or not, what some would find frustrating, I have been getting a kick out of..

    If you can't laugh with yourself, and have NO patience, don't try this install yourself.

  17. #17
    Join Date
    Jun 2007
    Posts
    396
    Post Thanks / Like

    Default

    Taken everything apart, re-soldered most all the wires from scratch. Am just doing the final resistance check on all the grounds. then I will re-install her everything, put the neck back on, fire her up..

    The very next post I put in this thread will either be a EUREKA moment, or a 'toss the hands up in defeat (although I will keep trying until I get it of course).

    The wiring as it stands probably couldn't be closer to spec, nor wired any more professionally than it is at this point.. while I feel everything is perhaps more clean and tidy than it was when I just went back in (but not really), I am not sure I have corrected anything, although I did rewire everything so at least I will know I can't do any better job of that..

    Here goes nothing..

  18. #18
    Join Date
    Dec 2008
    Location
    Japan
    Posts
    747
    Post Thanks / Like

    Default

    Now I know why they call it the sustainiac. It's not what it does it's what it makes you do. Maxwell you have become a sustainiac!

    Your perserverance is admirable. I appreciate your on-going posts because it lets me know that I'm not alone. The one thing that starts creeping into my mind at times like these is, "is the unit itself defective?" 9.5 times out of 10 it turns out it wasn't, but for the odd 5 percent where there was something wrong with a part I was installing, there was nothing more frustrating. Hope you have it sussed out soon. Good luck!

  19. #19
    Join Date
    Jun 2007
    Posts
    396
    Post Thanks / Like

    Default

    Complete failure..

    I am not certain I failed legitimately (and I do call this one a fail.. this round)... considering what is happening (pups work fine, unless you turn them off, at which point sustainer works with intermittent harmonics, I've come to the conclusion the likely culprit is the harmonic tone pot..

    Likely bad from the day it was made..

    Mr Hoover agrees it could be a bad tone switch.

    ---

    Sooooo

    After all this.. I'm going to send it to him to figure out..

    IN about 2 weeks, I'll have it back and working.. as it is, I could screw with it two more weeks (and I would) and get nowhere.,. I beat this horse to death.. all resistance checks, and chain of wiring suggest the harmonic tone pot switch.

Page 1 of 2 12 LastLast

Posting Permissions

  • You may not post new threads
  • You may not post replies
  • You may not post attachments
  • You may not edit your posts
  •