-
November 6th, 2010, 07:58 PM
#1
 Magnet swapping photos and explanation (Pic heavy)
This is so easy, even I can do it. Believe me, that's saying something.
For this particular photo demo, I used an AlNiCo V covered pickup, and I'm putting in a rough-cast AlNiCo IV magnet. The original PAFs used the rough or sand cast magnets, and up until 1961 or so, used A2, A3 and A4 magnets. In my case, I'm also using the historically correct length for an early PAF, 2.37 inches. Gibson switched to a longer 2.5" magnet later in the 60s.
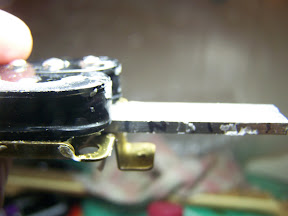
First I removed the pickup surround, then I used a Dremel to cut the solder that holds the cover on.

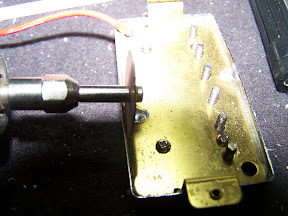
Then I gently loosened the cover using a small screwdriver, breaking the wax seal.

Edit: Loosen the four bobbin screws on the bottom of the baseplate before you attempt to get the magnet out. In the photo above, they are the only phillips screw heads showing. Once the cover was removed, the magnet was easy to see. It's sitting on the baseplate between the polepieces and slug pieces.
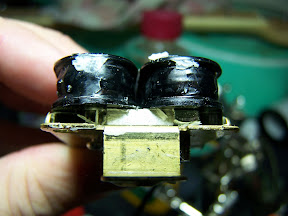
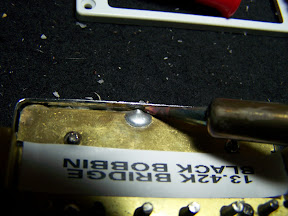
After loosening the magnet by using a small screwdriver once again, I started to gently push the magnet out. Be careful when doing this, and avoid touching the windings! A broken winding will most likely result in an unusable pickup.
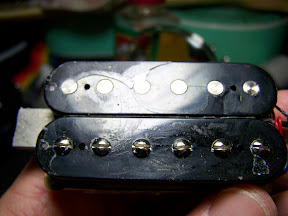
Be sure and mark North on the pickup you're removing so you can reuse it later, if so desired. The North side will face the slug bobbin (the one without screws) on a normal PAF style humbucker.
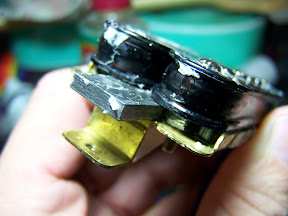
I have two sizes of magnet, the 2.37 and the 2.5 inch, so I measured to see which one this pickup was loaded with. As I said above, this is the historically correct 2.37" magnet. I think it's actually 2.36xxxx or something, but 2.37 is close enough.

Next I inserted the new A4 magnet, making sure to line up North with the slug bobbin side.

Once the magnet is fully inserted and evenly lined up, tighten the bobbin screws back down, put the cover back on and re-solder the cover to the baseplate.
Ideally you should first dip the cover in melted parafin (or beeswax if you're very fancy). If you don't have wax handy, you can also put a thin piece of masking tape over the slug bobbin before putting the cover back on to help dampen the metal-to-metal contact. I'll probably use a hair dryer to get some wax melted and to help suppress microphonics. The older PAFs were actually unpotted, but I prefer less feedback to historical correctness in this case.
That's it! Not too hard, is it? I was a little intimidated at first, but it's been pretty easy so far. I'll be happy to answer any questions and help my fellow Fretters with their magnet swaps, if I can. I'm certainly far from expert, but I do have some experience now.
Last edited by FrankenFretter; November 11th, 2010 at 06:30 PM.
Reason: Missed an important step or two!
-Sean
Guitars: Lots.
Amphs: More than last year.
Pedals: Many, although I go straight from guitar to amp more often lately.
-
November 6th, 2010, 10:41 PM
#2
Wow! Thanks for that. I always wondered how that was done. Very good explanation and photos. Now I feel more confident should I ever give it a try.
Maybe this should be a sticky?
"No Tele For you." - The Tele Nazi
Ha! Tele-ish now inbound.
-
Post Thanks / Like - 1 Likes
-
November 7th, 2010, 12:18 AM
#3
Cool beans, Sean. Does that work for refrigerator magnets?
-
November 10th, 2010, 08:02 AM
#4

Originally Posted by
Spudman
Wow! Thanks for that. I always wondered how that was done. Very good explanation and photos. Now I feel more confident should I ever give it a try.
Maybe this should be a sticky?
Not sure how to do a sticky. Does the mod have to do that?
Glad it was helpful, Spud. I'd heard from others that it was pretty easy, so I had to try it. Magnets are cheap, and if you look on Ebay, you can find a good assortment of them.
Originally Posted by
Heywood
Cool beans, Sean. Does that work for refrigerator magnets?
Fridge magnets have a cool vibe to them...
-Sean
Guitars: Lots.
Amphs: More than last year.
Pedals: Many, although I go straight from guitar to amp more often lately.
-
November 10th, 2010, 08:05 AM
#5
Can you wax pot with straight beeswax? Or does it need to be a paraffin/beeswax mix?
-
November 10th, 2010, 08:08 AM
#6
Originally Posted by
Commodore 64
Can you wax pot with straight beeswax? Or does it need to be a paraffin/beeswax mix?
I'm not sure about that one. I would imagine that the mix would work better, though.
Maybe somebody else who's more in the know about wax potting could answer this?
-Sean
Guitars: Lots.
Amphs: More than last year.
Pedals: Many, although I go straight from guitar to amp more often lately.
-
November 10th, 2010, 08:15 AM
#7
I have a P-90 PUP that has a busted plastic plate, exposing some of the windings. I'm hoping I can just wax pot it. I have an asston of beeswax, but no paraffin although, paraffin is cheap and easy to find, I should just get some.
-
November 10th, 2010, 08:55 AM
#8
Excellent tutorial with all the right details. This is simpler than I thought.
Thx!
Guitar: Gibson SG Standard Natural Burst, Squier CV 50's Tele, Hell Guitars No. 2, Squier CV 50's Strat, Reverend Club King 290, Taylor 522e 12-Fret mahogany,
Squier Vintage Modified Jaguar Bass Short Scale
Amp: Fender Super Champ X2 Head, Egnater Tweaker 15, Fender Mustang I, Acoustic B20 1x12 bass amp
Pedal: Budda Budwah wah, Wampler Ego Compressor, Electro-Harmonix Soul Food, Voodoo Lab Sparkle Drive, Wampler Velvet Fuzz, Seven Sisters Eve Tremolo, TC Electronics Gravy Tri Chorus & Vibrato, Catalinbread Echorec, TC Electronic Alter Ego 2 Delay, Hardwire Supernatural Ambient Verb, MXR Carbon Copy, Catalinbread RAH, Big Muff Pi with Tone Wicker, BYOC Mouse 2.0 Distortion, BYOC Boost/OD-2
-
November 10th, 2010, 12:07 PM
#9
Very neat, Sean! I'm glad they stick-ied the thread because I missed it the first time.
-
November 10th, 2010, 03:05 PM
#10
Thanks, guys!
I think the next time I take a cover off of a pickup, I'm going to use a soldering iron and a solder sucker. I'm not too sure the Dremel idea is a good one, but that's the way it was done in the online article I learned my method from.
I'd love to hear feedback from others that have done this. I'm sure I could use a few pointers to perfect my technique.
-Sean
Guitars: Lots.
Amphs: More than last year.
Pedals: Many, although I go straight from guitar to amp more often lately.
-
November 10th, 2010, 03:07 PM
#11
Originally Posted by
Commodore 64
I have a P-90 PUP that has a busted plastic plate, exposing some of the windings. I'm hoping I can just wax pot it. I have an asston of beeswax, but no paraffin although, paraffin is cheap and easy to find, I should just get some.
Is that a metric asston, C64?
I may be wrong about this, but I think that the beeswax potting is more of a nostalgia thing than it is actually superior in any way. Anyone who knows, feel free to jump in.
-Sean
Guitars: Lots.
Amphs: More than last year.
Pedals: Many, although I go straight from guitar to amp more often lately.
-
December 14th, 2010, 08:14 PM
#12
I think the next time I take a cover off of a pickup, I'm going to use a soldering iron and a solder sucker. I'm not too sure the Dremel idea is a good one, but that's the way it was done in the online article I learned my method from.
I'd love to hear feedback from others that have done this. I'm sure I could use a few pointers to perfect my technique.
Funny, I just posted on my guitar blog about this. It's a video by Mojo music and the guy uses a cool trick with a razorblade to seperate the solder from the cover.
http://www.guitarify.com/2010/12/how...bucker-covers/
-
December 16th, 2010, 11:21 PM
#13
Originally Posted by
guitarify
I finally got a chance to look at the video. The razor blade trick is a good one, I'll be trying that soon. I also realize that my soldering iron is not good enough (30w) for what I'm doing. I guess I also might invest in a bit of beeswax.
-Sean
Guitars: Lots.
Amphs: More than last year.
Pedals: Many, although I go straight from guitar to amp more often lately.
-
September 6th, 2011, 01:34 PM
#14
I think I'm going to try the razor blade trick here soon. I have a covered ceramic hummer that came out of an Agile that I want to swap the magnet for an A2 and throw in my Tele project. First I have to finish the Agile project that I'm almost done with, though. Stay tuned!
-Sean
Guitars: Lots.
Amphs: More than last year.
Pedals: Many, although I go straight from guitar to amp more often lately.
-
June 27th, 2013, 06:40 PM
#15
I bought a solder gun (a Weller) at a garage sale for $5, so I think it'll make the cover removal easier. I'm hoping to do some more swapping this weekend (magnet swapping, that is). I did a set of P90s recently, and they turned out well, but I wonder if anyone has any tricks with the polarity, other than the fact that you want like polarities touching the poles?
-Sean
Guitars: Lots.
Amphs: More than last year.
Pedals: Many, although I go straight from guitar to amp more often lately.
-
April 1st, 2022, 06:09 PM
#16
I had to come back here and revisit my own tutorial, because it's been so long since I've done a mag swap. Might do one with my new Vintage Peter Green/Gary Moore LP, since the pickups are A5 and I prefer A2.
-Sean
Guitars: Lots.
Amphs: More than last year.
Pedals: Many, although I go straight from guitar to amp more often lately.
-
April 2nd, 2022, 11:54 AM
#17
Originally Posted by
FrankenFretter

I had to come back here and revisit my own tutorial, because it's been so long since I've done a mag swap. Might do one with my new Vintage Peter Green/Gary Moore LP, since the pickups are A5 and I prefer A2.
Good to see you again! I've done that same thing with stuff I've posted in various places. It'd be better if I could just remember 
Axen: Jackson DK2M, Fender Deluxe Nashville Telecaster, Reverend Warhawk 390, Taylor 914ce, ESP LTD Surveyor-414
Amphen: Jet City JCA22H and JCA12S cab, Carvin X-60 combo, Acoustic B20
Effecten: "Thesis 96" Overdrive/Boost (aka DVM OD2), Hardwire DL-8 Digital Delay/Looper, DigiTech Polara Reverb, DigiTech EX-7 Expression Factory and CF-7 Chorus Factory, Danelectro CF-1 Cool Cat Fuzz
"I wish Imagine Dragons would be stuck in an Arcade Fire for an entire Vampire Weekend."--Brian Posehn
-
April 18th, 2022, 01:37 PM
#18
Ditto on the magnet swapping...
I experimented with A2, A3, A4, and A5 magnets on various winds. Although I still have a couple of A5's, my preference is A2 magnets for the bridge and A4 magnets for the neck with most of my humbuckers...even with the hotter bridge pickups.
Ah, nothing relieves the discomfort of GAS pains like the sound of the UPS truck rumbling down your street. It's like the musician's Beano.


 Reply With Quote
 Hopeless Noodler

 FrankenFretter*** liked this post