Warning: preg_replace(): The /e modifier is deprecated, use preg_replace_callback instead in ..../includes/class_bbcode.php on line 2958

Warning: preg_replace(): The /e modifier is deprecated, use preg_replace_callback instead in ..../includes/class_bbcode.php on line 2958

Warning: preg_replace(): The /e modifier is deprecated, use preg_replace_callback instead in ..../includes/class_bbcode.php on line 2958

Warning: preg_replace(): The /e modifier is deprecated, use preg_replace_callback instead in ..../includes/class_bbcode.php on line 2958

Warning: preg_replace(): The /e modifier is deprecated, use preg_replace_callback instead in ..../includes/class_bbcode.php on line 2968

Warning: preg_replace(): The /e modifier is deprecated, use preg_replace_callback instead in ..../includes/class_bbcode.php on line 2958

Warning: preg_replace(): The /e modifier is deprecated, use preg_replace_callback instead in ..../includes/class_bbcode.php on line 2958

Warning: preg_replace(): The /e modifier is deprecated, use preg_replace_callback instead in ..../includes/class_bbcode.php on line 2958
The .45 is Alive! (or how to build your own tube amp in seventy billion steps.)
Page 1 of 2 12 LastLast
Results 1 to 19 of 25

Thread: The .45 is Alive! (or how to build your own tube amp in seventy billion steps.)

  1. #1
    Join Date
    Jun 2008
    Location
    Down Under
    Posts
    1,706
    Post Thanks / Like

    Default The .45 is Alive! (or how to build your own tube amp in seventy billion steps.)

    So quite some time ago I hinted that I was planning to resurrect an old amp and turn it into something resembling the classic Marshall JTM45.

    Well, it's taken me 6 months or so, but as of Sunday, I'm absolutely delighted to announce "It Lives!"

    Lets go back a bit though.

    I scored a Vase Bassman 60 half stack maybe 15-20 years ago. Don't be surprised if you don't know the name, they were made in Australia (Brisbane) in the 60's and are, based on my research at least, extremely rare animals.

    The head was 6L6GC powered and whilst it of course had no Master Volume in line with the trend of the time, it did have inputs for both 4 and 6 string Bass and guitar. It also, did not function at all, due I suspect, to the fact it had quite literally had a fire break out inside it.

    At the time there was precious little about tube amps on this new "internet" thing that had just happened, and all my training was on solid state devices so tubes were a mystery. I also had no comprehension that an old tube amp could be worth anything, so I basically butchered it pretty savagely as I tried to turn it into a hybrid of JCM800 preamp and a Fender power stage using whatever I could rat from the junk bin at work (at the time I was repairing electronics for work). It hummed and squealed and oscillated and was generally just horrible. Looking at the crazed rats nest of wiring, it's hardly surprising.

    Here's what it looked like after my first butchery...


    Last shot before I ripped this mess out... by Ch0jiN, on Flickr

    And this is what it looked like on the outside..


    Classic Combo by Ch0jiN, on Flickr

    So quite some time ago I started to realise just how rare this amp was, and I was feeling really bad about destroying a bit of Australian music history, so I got in touch with the guys who now own the brand, only to discover there are no existing schematics for this particular amp, so there was no way I could rebuild it exactly as it was.

    I thought for a long time about what to rebuild it as, and the Fender Bassman/Marshall JTM45 seemed like the right fit. Same vintage, same bass amp as a guitar amp vibe, and the whole "build it in ya shed" approach.

    I think this is a good place for the end of part one...

  2. #2
    Join Date
    Jun 2008
    Location
    Down Under
    Posts
    1,706
    Post Thanks / Like

    Default Part II

    Welcome to Part II

    So I decided on copying the original JTM45 as the circuit for the rebuild and set about ordering piles of parts. I chose from the usual suspects for this kind of project, Replica transformers from Marstran, turret board from Watts Tube Audio, Sprague, Sozo and F&T caps, alpha pots and so on. I even used vintage style cloth covered wire throughout (not because I think it sounds better, because it looks amazingly cool, eliminates wire stripping, and stays in place very nicely.)

    Once parts started to arrive the challenges started to become apparent. Here's some of the fun and excitement that occurred when I started mocking things up.

    The Vase chassis is mounted upside down compared to a Marshall so all my controls are reversed.

    The Vase chassis had the output tranny, inputs, cap cans, controls, and inputs all in different places to the Marshall

    The KT66's are much bigger than 6L6's, so late in the piece I discovered if I mounted the power tubes "conventionally", the chassis would not fit back in the shell. (this was a considerable challenge)

    The rear of a JTM chassis is completely exposed, so plenty of room for the traditional captured power cord, two speaker jacks, a fuse and an impedance switch. The back panel of the Vase covers 2/3 of the available real estate, so I had to cram.

    So first things first, here's how it all went down.

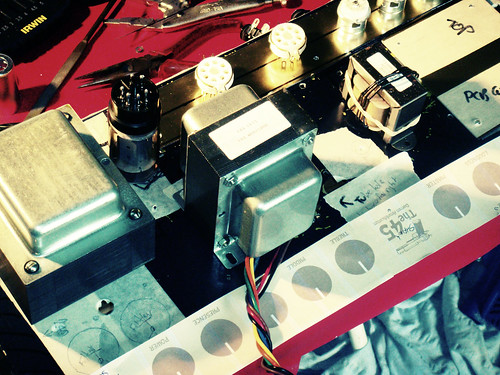
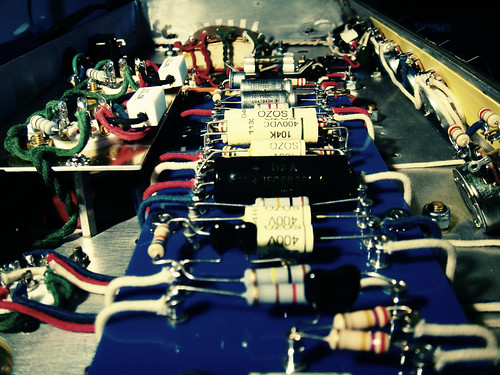
    I started out just visually laying out how all the big components would be laid out. I wanted to keep it as close to the original design to minimize hum and oscillation issues.


    Testing Layouts by Ch0jiN, on Flickr


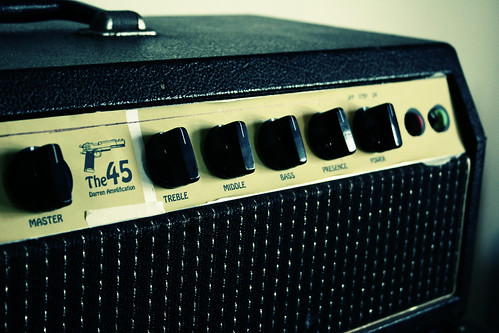
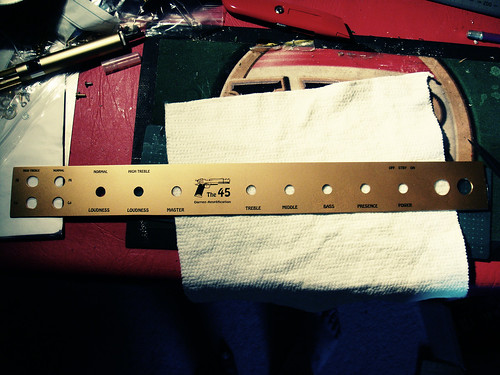
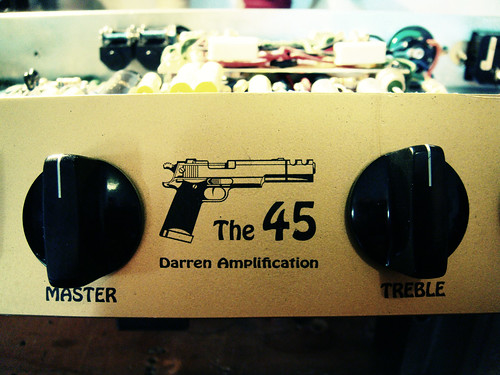
    Here's a control panel mock up on the head shell


    Control mockup by Ch0jiN, on Flickr


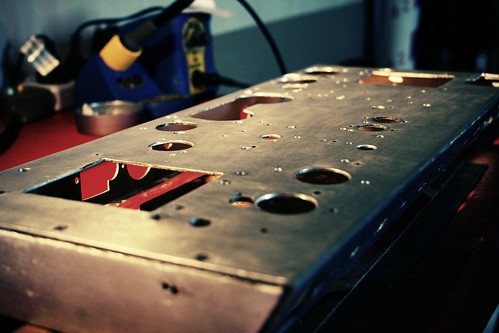
    Then I completely stripped the chassis back to bare metal using chemical stripper and a wire brush attachment for my drill.


    Bare Chassis by Ch0jiN, on Flickr


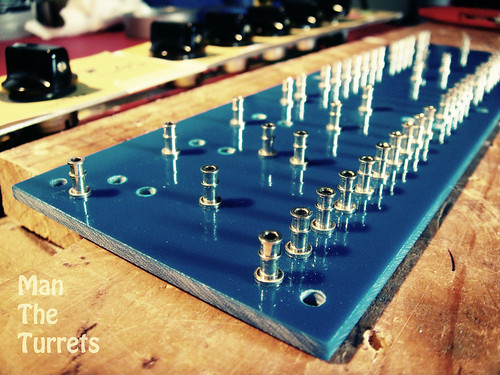
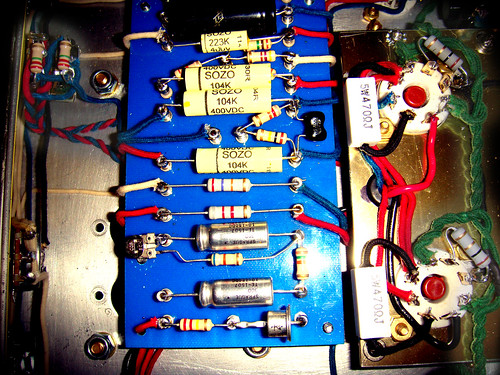
    Initially I was super impressed with the turret board, but the way they shrunk it to accommodate modern resistors actually made the layout quite cramped and tricky in places.


    Man the turrets by Ch0jiN, on Flickr

    So while I was waiting for parts and working out where all the bits would fit, I made some calls on design.

    I decided to keep the original (now "Vintage") red and green indicator lamps and the rotary power switch as a nod to the original Vase. Also retained was the chassis (although massively modified) and of course it's going back in the original head shell.

    I decided to use a nice modern IEC style power socket with integrated mains fuse. It saved me space on the back panel by not needed a separate mains fuse and when it comes to power, old school 'capture' cords can stay in the 60's.

    The only other change from "original" JTM45 spec is that I've left out the "flying" resistor, rotated the power transformer 90 degrees (so I didn't have to cut out a different hole) and whilst not connected yet, it'll have a Lar/Mar style PPIV MV. I've also top mounted both cap cans instead of just one.

    So with the decision made to replicate the JTM as closely as practical, I had to get cutting, and filing, and sanding, and cutting, and more filing, and a bunch of drilling, then more filing and, well you get the picture.

    Because every single component, with the exception of the power transformer, was going to have to be mounted in a different place, I had to take a chassis that had already been drilled and filed for two amp designs, and make it ready for a third. As you probably realize, you can take aluminium away from a chassis, but you can't easily add it back. Luckily, I managed to score a huge section of gold anodized aluminium from a local scrap guy which was a massive score as it looks like brass and cost $2 !! I made the front and rear panels out of it as well as all the sections that look "brass like" in the pictures.

    I made a section for mounting the three 12AX7's, a blank plate to cover the original "drop through" output tranny, and most significantly, the mounting tray for the power tubes, but I'll come back to that.

    Oh, I almost forgot. I absolutely wanted to maintain the "four hole" layout the Plexi amps were famous for. Great in theory, but the Vase chassis has it's control plate at a 45 degree angle, not 90 like a Marshall, so I had to get all choppy to fit all four sockets in there.

    The hardest bit though was fitting those monster KT66's in. I mentioned before that I discovered late in the design how massive they were, but luckily I was still in the metalwork phase so whilst annoying and time consuming, it could have been worse. I could have discovered it after wiring it all up.....

    Here's where I get a bit McGuyver.

    For the KT66's to fit, I had to drop them 20mm down into the chassis. That meant fabricating a mounting plate, installing steel standoffs, fabricating a cover plate (with massive holes in it, those KT's are FAT man) and relocating the speaker outputs further away from the impedance switch than I'd have preferred.

    It was quite a mission getting everything to line up the way I wanted for the custom power tube mount I can tell ya. I built this entire thing on a little table in my dining room with basic tools. No workshops were harmed in this project

    So they were the basic design considerations and biggest challenges. On to part 3

  3. #3
    Join Date
    Jun 2008
    Location
    Down Under
    Posts
    1,706
    Post Thanks / Like

    Default Part III

    OK time for more pics and less of my talking!!

    Here's the power section. Note the Marstran PT rotated 90 degrees to match the chassis cutout, the beefed up cloth covered heater wires and to keep it retro, I decided to lace up my wiring with waxy string instead of cable ties or heat shrink. Currently the amp is partially star grounded. You can see the mains grounded to one PT bolt and everything else grounded to the other PT bolt.

    The lead dress is in draft stage, but as you can see, I tried to keep heaters away from power and signal, and cross them at 90 degrees where possible. Solid core cloth covered wire is amazing for this. With the exception of the modern looking OT wires, everything else just stays in place even without the string!


    The 45 Power 2 by Ch0jiN, on Flickr

    Another shot of the power section


    The 45 Power by Ch0jiN, on Flickr

    In this one you can see just how deep I had to recess the power tubes. You might also note the yellow insulation inside the control panel. With massive chassis holes, I had to mount the pots to the actual control panel I fabricated. This meant that the solder lugs on the pots came too close to the chassis for my liking, so I sliced up a large section of heat shrink and spray glued it to the chassis. Again with the McGyverin'


    The45 Insides by Ch0jiN, on Flickr

    Here's a shot showing off my first attempt at making the wiring look nice. It's not great, but I think it's passable.


    The45 Layout by Ch0jiN, on Flickr

    Here's the front panel. Waterslide decals over gold anodized aluminium with matt paint over that. Not totally happy with it and might do it again.


    The 45 Front Panel by Ch0jiN, on Flickr

    and here's a top down showing how it all went together


    The 45 Topdown by Ch0jiN, on Flickr

    So when I get home, I'll add part IV which will cover power on, initial thoughts and what I need to do from here. Stay tuned!!

  4. #4
    Join Date
    Jun 2008
    Location
    Down Under
    Posts
    1,706
    Post Thanks / Like

    Default Part IV

    So the question every amp builder wants the answer to about now is probably "So did it fire up first time?"'

    Well Yes and No.

    "Yes" in so much as there were no explosions nor horrible noises.
    "No" because I somehow used a 5k trim pot for the bias instead of a 25K so my bias was almost double what it should have been (around 80mA eek!)

    I turned it off, found my mistake and tried again. Biased nicely, I gave it a bit of a detailed listen plugged into it's 4x12 cab.

    First impressions were that it sounds surprisingly good for something I built out of a schematic and my imagination! No noise, very minimal hum (on par with my USA made Peavey anyway) and power to burn! I haven't wired in the MV yet as I want to perfect the layout of the original circuit first, so as you can imagine, it gets real loud, real fast!

    Two things need attention though and I absolutely welcome feedback on this.

    I have noticeable 50Hz hum, but only in standby!

    This is almost certainly lead dress. I had to run heaters close to the speaker jacks due to the whole lowering of the power tubes, as this kept them as far as possible away from my preamp tubes. The hum is cancelled as soon as I switch power on so it's not the end of the world, but I'll try a few things to see if I can improve it. Those solid core heater wires are NOT real flexible though so the chopstick method wont work there.

    I've also noticed a really slight "fizz" as notes ring out. I'm pretty sure it's parasitic oscillation. It scales with volume and is unaffected by tone and presence controls. You have to listen hard to hear it, but for a circuit famous for it's clean sound, I want to get it right. I've got plenty to try as I haven't even added grid stoppers as yet. but my plan is to loop some notes and go prodding with the chopsticks. As you can see in the pictures I do have most of the preamp and PI wires parallel, which looks nice, but is terrible for radiated fields.

    All in all though, it sounds a million times better than my first horrible attempt! Once I sort out the "fizz" I'll wire in the Lar/Mar PPIV MV (you'll see the pot is already mounted) and see how that goes. I'm also really keen to get it in the rehearsal room as I need to test for full power issues, which is patently impractical in my apartment

    Still on the to-do list is getting some brass screw cups and screws to fasten the rear cover, sourcing new rubber feet (they need to be a specific size as there are mounting cups on the speaker cab) and probably fitting a cap across the B+ switch to kill the power on "pop". The original had one, mine doesn't as yet, and as I'm using a 50 year old rotary switch, it tends to have a little "pop" to it.

    I imagine this thread will only be viewed by the amp nerds (you know who you are) but feel free to ask away if something intrigues you.

    Oh and here's my logo.


    The 45 by Ch0jiN, on Flickr

  5. #5
    Join Date
    Jul 2009
    Location
    Finland
    Posts
    3,424
    Post Thanks / Like
    Blog Entries
    23

    Default

    KUDOS!

    Love the logo 1911 complete with a comp & magwell too :-)

    Just about to do a 'huge' mod spree on my JVM...actually meaning changing or adding a resistor, a choke and a cap :-) I'd love to try building an amp some day, but I'll need a clearly instructed kit to do it since I have bare basic understanding of electronics only.
    Dee

    "When life's a biatch, be a horny dog"

    Amps: Marshall JVM 410H w/ Plexi Cap mod, Choke Mod & Negative Feedback Removal mod, 4x12", Behringer GMX110, Amplitube 3/StealthPedal

    Half a dozen custom built/bastardized guitars all with EMG's, mostly 85's, Ibanez Artwood acoustic & Yamaha SGR bass, Epiphone Prophecy SG, Vox Wah, Pitchblack tuner plus assorted pedals, rack gear etc. for home studio use.

  6. #6
    Join Date
    Jun 2008
    Location
    Down Under
    Posts
    1,706
    Post Thanks / Like

    Default

    Thanks Deeaa!
    I was wondering what to call it for ages, and it occurred to me that playing on the 45 angle might work. I've never been a revolver fan, so it had to be a 1911

  7. #7
    Join Date
    Feb 2006
    Location
    Uppah Noo Yawk
    Posts
    7,407
    Post Thanks / Like

    Default

    Quite the ambitious project, Darren. Looks like it came out great!
    DVM's Ever-Expanding Gear List:

    Guitars - W-A-A-A-Y-Y too many to list. Check 'em all out HERE

    Amps & Cabs - "Kap'n Kerrang-aroo" BYOC 18W TMB kit amp head; Mojave Coyote head; Fender Hot Rod Deluxe Lacquered Tweed Ltd. Ed.; Allen Sweet Spot kit amp; BYOC Tweed Royal kit amp; Epiphone Valve Jr. combo + mods; Drive 2x12 cab / Celestion G12M Greenback + G12H30; AB Custom Audio 1x12 cab / Celestion Alnico Blue

    Pedals/Effects - ZILLIONS, including DVM's Home-built Pedals - See some HERE and HERE, TOO!

    DVM's Gear Photos
    Visit MY WEBSITE!


  8. #8
    Join Date
    Oct 2005
    Posts
    7,254
    Post Thanks / Like

    Default

    Looks awesome, Cho! Thanks for the run-down.

    You need to incorporate this somehow
    Axen: Jackson DK2M, Fender Deluxe Nashville Telecaster, Reverend Warhawk 390, Taylor 914ce, ESP LTD Surveyor-414
    Amphen: Jet City JCA22H and JCA12S cab, Carvin X-60 combo, Acoustic B20
    Effecten: "Thesis 96" Overdrive/Boost (aka DVM OD2), Hardwire DL-8 Digital Delay/Looper, DigiTech Polara Reverb, DigiTech EX-7 Expression Factory and CF-7 Chorus Factory, Danelectro CF-1 Cool Cat Fuzz
    "I wish Imagine Dragons would be stuck in an Arcade Fire for an entire Vampire Weekend."--Brian Posehn

  9. #9
    Join Date
    Oct 2008
    Location
    Clear Lake, Texas
    Posts
    5,413
    Post Thanks / Like
    Blog Entries
    1

    Default

    Awesome build, Ch0jin! That wasn't so easy.

    Oh, and today is the 50th anniversary of the local MLB baseball team, the Astros, originally known as the Colt 45's!

  10. #10
    Join Date
    Jun 2008
    Location
    Down Under
    Posts
    1,706
    Post Thanks / Like

    Default

    @DVM Yeah ambitious is right! That's kind of why I didn't do a step by step build thread. In the back of my mind there was a nagging doubt that it would all explode in a ball of flames at first power on and I'd then be forced to deny all existence of the project I did find myself doing a lot more metalwork than I expected, and at times a drill press would have been a blessing, as would a bench grinder, but I muddled through with what I could use in an apartment.

    One thing I should share from this experience, is that building a medium sized amp from scratch (i.e. not from a kit) isn't a "cheap way out" of getting a great tube amp. Sure it cost me less than buying an actual Fender Bassman or Marshall JTM45, but once you factor in the extra tools I needed to buy, as well as things like spools of wire at like $30 a pop, freight on components from all over the world and so on, something like a pre-built Ceriatone becomes a comparable option.

    That said, I didn't do it to be cheap. I did it to pay homage to the original Vase Amp, as well as to prove to myself that I could. Probably a little more of the latter than the former actually.

    @ Marnold. That's awesome! Lando Calrissian getting the ladies hammered! We don't have Malt Liquor over here so I have no idea what that actually is, but it sounds great!
    @ Tig. Wow, so many 45 references huh!

  11. #11
    Join Date
    Jun 2008
    Location
    Down Under
    Posts
    1,706
    Post Thanks / Like

    Default

    sneaky update...

    Got home from work today and thought I'd try the 45 through the single 12" in my combo, just to make sure the tiny buzzing noise I heard on notes wasn't to do with the speakers in the 4x12.

    Either the magic wiring faeries fixed it while I was at work, or it's something to do with the 4x12 cab. Through the 8 Ohm 12" it sounds perfect all the way up to 'too loud'.

    An impedance related wiring issue? (the cab is 16 Ohm and the Single is 8 so I'm switching on the back of the amp), a voice coil rubbing? (the speakers -are- 50 years old), or just a vibration somewhere?

    I'm sure if I could stop playing it for a second I could figure it out, but I've really been having fun getting familiar with it!

    The tone controls work nicely, although the bass comes on thick and fast. I suspect the louder I go the more I'll end up cutting the bass back, but we shall see. The high treble channels are super bright with the stock 100pf cap (I have a silver mica here) and I've been digging the normal channels a lot more. I might try a couple of different caps in the bright channel there and see what I like. I've heard Marshall went anywhere from 100pf to 500pf on this circuit over the years.

    I hope to get the MV wired in on the weekend, and I'm very keen to see it sounds with the inputs jumped and both volumes cranked, but with the MV reigning it all in.

  12. #12
    Join Date
    Oct 2005
    Posts
    7,254
    Post Thanks / Like

    Default

    Quote Originally Posted by Ch0jin View Post
    @ Marnold. That's awesome! Lando Calrissian getting the ladies hammered! We don't have Malt Liquor over here so I have no idea what that actually is, but it sounds great!
    Malt liquor is basically high-strength regular American beer. Most regular mainstream beers are ~5% alcohol by volume. Malt liquor can be 6-9%. It is often sold in a "40," that is, a 40 oz bottle. Those Billy Dee Williams commercials used to be on all the time back in the day.

    Check this site for all your malt liquor questions http://www.40ozmaltliquor.com/main.html
    Axen: Jackson DK2M, Fender Deluxe Nashville Telecaster, Reverend Warhawk 390, Taylor 914ce, ESP LTD Surveyor-414
    Amphen: Jet City JCA22H and JCA12S cab, Carvin X-60 combo, Acoustic B20
    Effecten: "Thesis 96" Overdrive/Boost (aka DVM OD2), Hardwire DL-8 Digital Delay/Looper, DigiTech Polara Reverb, DigiTech EX-7 Expression Factory and CF-7 Chorus Factory, Danelectro CF-1 Cool Cat Fuzz
    "I wish Imagine Dragons would be stuck in an Arcade Fire for an entire Vampire Weekend."--Brian Posehn

  13. #13
    Join Date
    Jul 2009
    Location
    MSP
    Posts
    3,913
    Post Thanks / Like

    Default

    Quote Originally Posted by marnold View Post
    Malt liquor is basically high-strength regular American beer. Most regular mainstream beers are ~5% alcohol by volume. Malt liquor can be 6-9%. It is often sold in a "40," that is, a 40 oz bottle. Those Billy Dee Williams commercials used to be on all the time back in the day.

    Check this site for all your malt liquor questions http://www.40ozmaltliquor.com/main.html
    Maybe someone will start a malt-liquor line of amps with references to Old E, Colt 45, St. Ides, etc. I'm already thinking about decals and potential models. I think Old E actually would be fairly appopriate for the amp Ch0 just built...

    BTW, nice work on the amp!
    Quote Originally Posted by Spudman
    Does anyone read the original post?
    Guitars: Gibson LP Studio, MIA Fender Precision, Carvin C350
    Amps: Genz Benz Shuttle 6.0 + Avatar B212 / Genzler 12-3, Acoustic B20
    Pedals: Pod HD500X, Diamond Compressor, Tech 21 VT Bass, Sonic Research Turbo Tuner

  14. #14
    Join Date
    Oct 2009
    Location
    Vancouver, B.C.
    Posts
    1,522
    Post Thanks / Like

    Default

    Great work! Do you have the schematic to post too?

  15. #15
    Join Date
    Jun 2008
    Location
    Down Under
    Posts
    1,706
    Post Thanks / Like

    Default

    Thanks guys, I've learnt a new thing today! We have some boutique and import beers (almost all from the UK) that head north of 6%, but we still just call them beers I'm not a big fan actually, I think as you go higher in alcohol content the taste suffers. IMHO I reckon from 4.9 to 5.2 is about the right strength

    Hey Don, I was working from a regular old Marshall JTM45 schematic and the assembly guide for the Metro Amps kit. I'll link up the schematic tonight. The Metro guide was used as, well, a guide, only. Although my physical layout is a little different and I used different wiring colour codes, it was very helpful in terms of getting my assembly order right.

    Whilst still connected to the single 12" I threw a couple of dirt pedals at it last night. So nice! I tried my Big Muff, King of Tone, and to earth shaking effect, my "Denim Demon" (which is essentially a zvex woolly mammoth bass fuzz). The bass fuzz is capable if massively accentuating your bass notes, and when combined with the 45 you get huge waves of thick scooped fuzz with a bottom end that literally shakes everything in the room. It's awesome!

    Tonight I'll introduce it to my El Capistan and see how it sounds with a little reverb and tape echo. Then I suppose I should work on getting it back into the head shell tracking down the buzz in my 4x12.

  16. #16
    Join Date
    Nov 2005
    Location
    All over Texas...
    Posts
    4,071
    Post Thanks / Like

    Default

    Man that's just awesome. I wouldn't begin to even consider the possibility of trying to comprehend the idea that I might be able to build an amph. Electricity and I don't mix. I once tried to change out a wall outlet, and unbeknownst to me there was a short in the wiring where I couldn't see it. Even though the breaker was flipped off, the power to the outlet was going from 0 to 220 at random times. A shower of sparks, cloud of acrid smoke, a screwdriver melted nearly in half, and lights dimming like the execution scene in an old movie was all I needed to know about staying away from anything electrical.

    I don't know why I felt the need to share that, but it's really cool that you have the know how to take on a project like this!

    Oh, and see if you can YouTube the old Billy Dee Williams commercials. He was one smooth dude!

  17. #17
    Join Date
    Jun 2008
    Location
    Down Under
    Posts
    1,706
    Post Thanks / Like

    Default

    Thanks Kat! I've been electrocuted a few times myself so I have a healthy regard for electricity. I was also trained as an electronic engineer, so that helps when it comes to projects like this

  18. #18
    Join Date
    Oct 2009
    Location
    Vancouver, B.C.
    Posts
    1,522
    Post Thanks / Like

    Default

    Quote Originally Posted by Ch0jin View Post
    Thanks Kat! I've been electrocuted a few times myself so I have a healthy regard for electricity. I was also trained as an electronic engineer, so that helps when it comes to projects like this
    I don't know, I have a couple of EE degrees myself (and have been shocked many times on the bench) but I don't think I'd try to build an amp. You've just got the stuff, Cho!

  19. #19
    Join Date
    Jun 2008
    Location
    Down Under
    Posts
    1,706
    Post Thanks / Like

    Default

    You're too kind Don

    So a quick update.

    On the weekend I decided to try and lower the (already acceptable) background hum and wire up the Lar/Mar PPIMV.

    I had a look at my heater wiring and decided I could run the heaters to V5 (bottom right in the pic) a little better. I originally had them under the 470 Ohm 5W with the other tube wiring. I moved them to the other side of the socket as you can see in the pic and Boom! no more hum at all. It's not as pretty as it could be because I had to splice in a little extra wire to make it reach, but I'm reluctant to rewire that whole heater run just to get rid of the join and associated little piece of heat-shrink now that it works.

    So, impressed with myself for sorting that, I charged into the Master Volume. For those that don't know it and are interested, I went for the Lar/Mar PPIMV style, due to many glowing reviews when used in early Marshall amps. Here's the info.

    Now I know the instructions do say not to mount the MV pot on the front panel, and to use shielded cable for the run to the tubes, but what use is a master volume on the back of an amp? I also wanted to stay OG with my look so modern shielded cable was out. Instead, I just twisted up some sexy solid core cloth covered wire, kept it away from anything signal related (as much as practical anyway) and crossed my fingers. You can see the two pairs of blue and red cable twisted up top left, growing out of the dual gang MV pot.

    I fired her up and whattaya know, it worked!

    Now the JTM45 is not a high gain amp, so I didn't expect to be able to dial in some JCM800 sounds, and sure enough, I can't.

    What I can do, is run the volume up nice and high, to the point where the amp is all set to make that huge, fat, warm, clean sound it's famous for, and reign it all back to apartment levels. Does it sound the same as turning it up? No. But it does sound very good, and it enables a lot more versatility of tones than having no MV. For instance I can run the volume at 2pm (which would bring the walls down) and just sneak the MV up to apartment friendly and I've got a great bluesy clean. If I then kick in my OCD, KoT, BMP etc, it freakin ROARS! I think the reputation the 5F6a and JTM45 have for "taking pedals" is well deserved. At least from what I've seen so far.

    So hum is gone and I have a working Master Volume!

    Next I'll add a pair of 5.6k swamp resistors. I don't -think- I'm getting any parasitic oscillation, but adding them doesn't effect the tone at all and it seems every amp tech recommends adding them as a precaution.

    After that, it's all about getting some new rubber feet, a few new screws with brass cups, maybe a couple of bespoke aluminium pieces to cover some horrible holes in the woodwork (the original amp had its mains power socket through the wooden back panel. As I have it now mounted in the amp chassis, I have an ugly hole to cover...) and the next pics should be of the amp in it's shell!

    I had a look at getting a quartet of 12" Scumnico's for the cab to replace the 50+ year old speakers that are in there now, but A. They are VERY expensive, and B. I'm not sure I'm cool with replacing real, actual, vintage speakers with speakers made to sound like vintage speakers, just because I think one of them has a bit of coil grind going on... H'mmmmmm More thinking needed there...

    Anyway... Here's the shot of the revised heaters and MV installed!


    Lar/Mar PPIMV by Ch0jiN, on Flickr

Page 1 of 2 12 LastLast

Posting Permissions

  • You may not post new threads
  • You may not post replies
  • You may not post attachments
  • You may not edit your posts
  •