Warning: preg_replace(): The /e modifier is deprecated, use preg_replace_callback instead in ..../includes/class_bbcode.php on line 2968

Warning: preg_replace(): The /e modifier is deprecated, use preg_replace_callback instead in ..../includes/class_bbcode.php on line 2958
BYOC Ross Compressor Clone
Results 1 to 6 of 6

Thread: BYOC Ross Compressor Clone

  1. #1
    Join Date
    Feb 2006
    Location
    Uppah Noo Yawk
    Posts
    7,407
    Post Thanks / Like

    Default BYOC Ross Compressor Clone

    For any of you Fretters considering a first-time foray into the world of DIY pedal making, here's a good one to consider. Buildyourownclone.com has a kit based upon the legendary Ross Compressor that many consider the best compressor pedal design of all time. It's one of their cheaper kits at $75, and quite an easy build. If you can solder moderately well and follow directions, you can build this pedal, without a doubt.

    Additionally, the kit has some design flexibility. By leaving a couple of components out and swapping a couple of others (all the parts are provided) you can instead make the pedal into a clone of the MXR DynaComp, if that is your preference. And unlike either of these vintage pedals, the BYOC kit incorporates a third control they don't have. The "Attack" knob lets you control how quickly the compression kicks in and fades away at the end of the signal sustain.

    About the only slightly tricky thing is that the circuit uses a "trimpot" that has to be adjusted when the pedal is first used to optimize the compression/sustain. Basically, it's a matter of repeatedly picking a note while s-l-o-w-l-y turning the trimpot screw until the maximum sustain is attained with the "Sustain" control dimed. You'll know it when you hear it! Through most of the pot's travel, you get a very thin, low volume output, so when you start to get into the "sweet spot", the tone fills out and gets much louder. If you go too far, it thins back out again.

    Below are a couple of photos I took of the Ross clone I built this weekend. Actually, I didn't buy the BYOC kit, but just ordered the parts directly from several places where I get all my pedal components. This can reduce the cost vs. the kit price pretty substantially, but you have to be buying more than one pedal's worth of parts at a time. Otherwise, the combined shipping costs will kill you and you're better off just buying the BYOC kit.

    The instructions for all the BYOC kits are posted on their website as PDF documents, and each includes a complete "bill of materials". This is what I've used to buy the parts directly from component suppliers. I have these BOM's broken down by supplier, part number and part cost for several of the BYOC kits. If you're ever looking for one, shoot me a PM and I'll let you know if I have it.

    Here are the two pix. As you can see, I haven't applied the decal graphics yet (just labeled the top view image with MS Paint), and the battery snap hasn't been soldered in yet, either. But it's fully functional with a standard 9V AC adapter, and works like a charm. Full, rich tone and lots of sustain:

    Last edited by duhvoodooman; July 3rd, 2007 at 06:58 AM.
    DVM's Ever-Expanding Gear List:

    Guitars - W-A-A-A-Y-Y too many to list. Check 'em all out HERE

    Amps & Cabs - "Kap'n Kerrang-aroo" BYOC 18W TMB kit amp head; Mojave Coyote head; Fender Hot Rod Deluxe Lacquered Tweed Ltd. Ed.; Allen Sweet Spot kit amp; BYOC Tweed Royal kit amp; Epiphone Valve Jr. combo + mods; Drive 2x12 cab / Celestion G12M Greenback + G12H30; AB Custom Audio 1x12 cab / Celestion Alnico Blue

    Pedals/Effects - ZILLIONS, including DVM's Home-built Pedals - See some HERE and HERE, TOO!

    DVM's Gear Photos
    Visit MY WEBSITE!


  2. #2
    Join Date
    Sep 2005
    Location
    Albuquerque, New Mexico, USA
    Posts
    6,009
    Post Thanks / Like

    Default

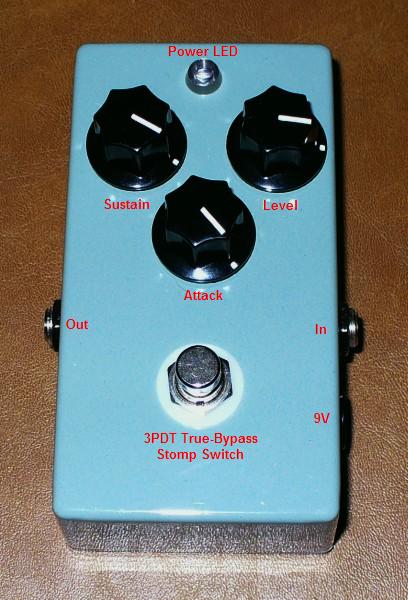
    That looks good Voo. Those old Ross compressors do the job. I'll bet you yours is much more transparent. My old unit has old parts that somewhat suck tone but it does make up for it when it's engaged. I used to use it exclusively on the Jubilee for Strat use. I'd play on the overdrive channel at breakup point and kick it in for soloing. It added the sustain and drive I wanted without adding gain. I like the looks of your pedal. I'm wondering how different they'd be in comparison.
    Guitars/Bass - MIM Fender Classic 50s Strat, MIM Fender Standard Strat, Squier Classic Vibe 50s Tele, Gibson Les Paul Studio, Epi '56 Gold Top Les Paul, Martin DSR acoustic, Sigma Martin Auditorium electric/acoustic, Squier Jazz Bass.

    Amps/Cabinets/Modelers - Model 2558 50 watt Marshall Silver Anniversary Jubilee combo w/ Celestion Vintage 30s, 4x12 Marshall cabinet w/25 watt Greenback Celestions, Fender Blues Junior w/ a couple of Billm mods, Line 6 POD 2.0, Roland Micro Cube

    Pedals/Effects - Cry Baby Classic Wah, Boss TU-2, Boss NS-2, Boss RC-2 Loop Station, Ross Compressor, MXR Micro Amp, Danelectro FAB Echo, Danelectro FAB Chorus, Danelectro Chicken Salad, Marshall Guv'nor Plus, Marshall Echohead, Duhvoodooman's Zonkin' Yellow Screamer, Digitech Digiverb, Digitech Bad Monkey, Dunlop Fuzz Face, Homemade Loop Bypass pedal, Duhvoodooman's Sonic Tonic (Maxon SD-9 clone +), Voodoo Labs Superfuzz

  3. #3
    Join Date
    Dec 2006
    Location
    Doylestown, PA
    Posts
    226
    Post Thanks / Like

    Default

    duhvoodooman,

    This looks like a fun project. Though I can solder, I haven't done much soldering of small components onto printed circuit boards. Do you recommend using a soldering iron of a particular wattage, and is it necessary to use a heat sink on the components while soldering them?
    Guitars: MIM Fender FSR Limited Edition Stratocaster with direct mount pickups, Schecter C-1 Plus, SX SST57 Powder Blue, Alvarez RD8 Accoustic

    Amps: Line6 Spidervalve 112

    Effects: Digitech Bad Monkey, Danelectro Cool Cat Chorus, GFS Delay, GFS Tuner, Behringer HB01 wah, Line6 Toneport GX, GuitarRig 3

  4. #4
    Join Date
    Feb 2006
    Location
    Uppah Noo Yawk
    Posts
    7,407
    Post Thanks / Like

    Default

    A 25W iron is perfect for this kind of fine solder work. The only component I've come across so far that requires the use of a heatsink is a 1N34A germanium diode. So I just clamp a small alligator clip between the diode body and the solder point, and I haven't had any problems. Just make sure the iron is fully heated and the tip is tinned & clean, and you should be able to make individual solder joints with only 2 or 3 seconds of tip contact.
    DVM's Ever-Expanding Gear List:

    Guitars - W-A-A-A-Y-Y too many to list. Check 'em all out HERE

    Amps & Cabs - "Kap'n Kerrang-aroo" BYOC 18W TMB kit amp head; Mojave Coyote head; Fender Hot Rod Deluxe Lacquered Tweed Ltd. Ed.; Allen Sweet Spot kit amp; BYOC Tweed Royal kit amp; Epiphone Valve Jr. combo + mods; Drive 2x12 cab / Celestion G12M Greenback + G12H30; AB Custom Audio 1x12 cab / Celestion Alnico Blue

    Pedals/Effects - ZILLIONS, including DVM's Home-built Pedals - See some HERE and HERE, TOO!

    DVM's Gear Photos
    Visit MY WEBSITE!


  5. #5
    Join Date
    Dec 2006
    Posts
    1,060
    Post Thanks / Like

    Default

    Can I ask a really dumb question?

    Why two different syle jacks? The "in" jack is obviously different than the "out"...I was just curious why? Im sure there is a simple answer that Im just not seein.

  6. #6
    Join Date
    Feb 2006
    Location
    Uppah Noo Yawk
    Posts
    7,407
    Post Thanks / Like

    Default

    Not a dumb question at all--a very good one, AAMOF!

    This and many other pedals use a stereo jack on the input side as a means of connecting battery power into the pedal circuit. The negative terminal of the battery is soldered to the extra "ring" connector on the stereo jack, and the circuit is then completed when a cord is plugged in. That's why you have to unplug your guitar from most battery-powered effects to keep them from draining the battery when the pedal is not in use. (Unless you have an auto-bypass AC adapter jack and keep that connected to to a wall wart, in which case the battery is automatically disconnected. The BYOC designs all use such an AC adapter jack, so that you can leave a "back-up" battery in the pedal for times that AC power isn't readily available or convenient and not have to worry about it draining down.)
    DVM's Ever-Expanding Gear List:

    Guitars - W-A-A-A-Y-Y too many to list. Check 'em all out HERE

    Amps & Cabs - "Kap'n Kerrang-aroo" BYOC 18W TMB kit amp head; Mojave Coyote head; Fender Hot Rod Deluxe Lacquered Tweed Ltd. Ed.; Allen Sweet Spot kit amp; BYOC Tweed Royal kit amp; Epiphone Valve Jr. combo + mods; Drive 2x12 cab / Celestion G12M Greenback + G12H30; AB Custom Audio 1x12 cab / Celestion Alnico Blue

    Pedals/Effects - ZILLIONS, including DVM's Home-built Pedals - See some HERE and HERE, TOO!

    DVM's Gear Photos
    Visit MY WEBSITE!


Posting Permissions

  • You may not post new threads
  • You may not post replies
  • You may not post attachments
  • You may not edit your posts
  •