
 Reply With Quote
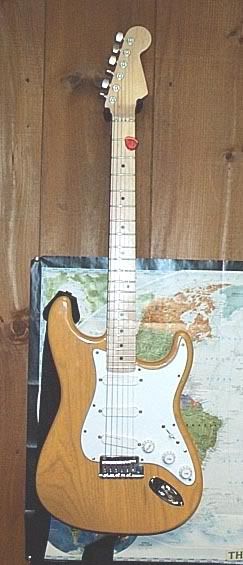
Here are a few shots of the Strat-O-Killer, actually taken before the logo was put on. No real bearing on this thread, I'm just a little proud of her.

 Regular Fretter

Several months back I built a fairly good quality Strat and ended up learning how to make waterslide decals (for the headstock). It's not hard at all and it's a nice personal touch when building your own instrument. A quick internet search turned up plenty of info on the basics but I learned a bit more from some trial and error.
If you don't know already, waterslide decals are the type of decals that come with some plastic model car kits. They're clear (except for the printing) and very thin so with a couple clear coats the edges disappear and it looks like a factory job.
--------------------------------------------------------------------------
Supplies:
Waterslide decal paper - can be found at any office supply store in packs of ten 8.5"x11" sheets or more. Lesser quantities can be found on ebay for short dough.
Graphics software - This can be as simple or complex as you have. I use a CAD program for work (computer aided drawing) and that has every conceivable option. Anything you can design and print with will work though. Even the Notepad program that's on every PC.
Printer - This will focus on inkjet printing but I believe there is waterslide paper that works with laser printing. The supreme printer is (I forget the name) the very expensive type that can use metallic ink cartridges. These run in the $500-$2000 price range and are the only way to get real silvers and golds (like many guitar manufacturers use). You can kind of fake it with an inkjet though.
I guess scissors and a shallow water pan are the only other things.
--------------------------------------------------------------------------
Design
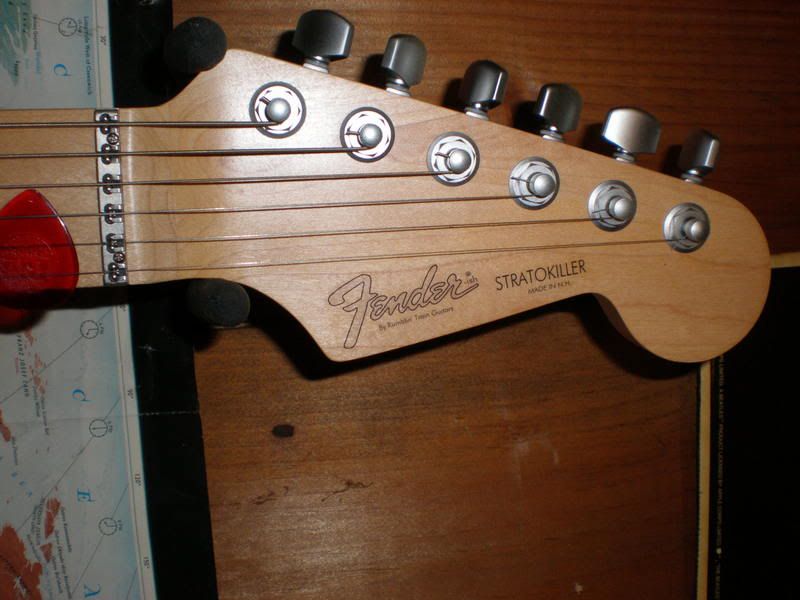
First you design your decal. For mine (shown below) I imported a photo of a Fender headstock logo into the CAD program (for reference) and carefully drew an exact replica. From there I changed it up a bit for personal preference. Once I had the design the way I wanted it I did a test printing on paper to see the actual size. I cut the test logo out and placed it on the headstock, then printed and checked it a couple more times until it was just right.
I'd say just play around in what ever program you use, you'll probably come up with some clever ways for getting what you want.
--------------------------------------------------------------------------
Printing
You may need to print a few, making color adjustments as you go. The waterslide paper is clear but it's on a (temporary) white paper backer so the printed colors will appear brighter than when the decal is over wood or paint. You can avoid wasting decal paper by printing a whole line of variations from left to right before cutting the sheet. That way you can print on the sheet again, as it will have straight ends. I did about four logos with different shades of gray (to mimic the silver in Fenders logo) across the sheet then cut out and test applied each one. The third darkest was the best match so I printed another row of four, this time all of them in the shade I liked. I figured it would be good to have extras.
I found out the hard way that inkjet ink runs when wet with any kind of solvent, including lacquer clear coat. I figured out that two or three VERY light dust coats of clear lacquer over the decal about ten minutes apart sealed the ink in very well. It could easily be lacquered over with the guitars final finish coat.
--------------------------------------------------------------------------
Installing
First thing is that wherever the decal is going should be clear coated or painted. You don't want to put a decal directly on wood. The decal should be the last thing in the finish layers before final clear coating. In my case I put it over the final satin clear coat so I can change it later if desired. It's not as durable but that doesn't bother me.
Cut out your printed and clear coated waterslide decals and cut them with as little extra material left on as possible. I was able to stay within about 1/16" of the printing all around. Don't leave long, thin areas though (like the bottom of the "F" or top of the "d" above). Leave a little material around them so they don't fold and twist like plastic wrap always seems to do.
Put the decal in a shallow pan of warm water for a minute or two. While it's soaking clean the surface it's going on. I use rubbing alcohol on a soft cotton rag or lint-free paper towel. When the decals paper backer is loose enough that you can start to slide the decal put the whole thing on your headstock, hold the decal with a finger tip and slide the backer out from under it. Position it just how you like it, press it in place a bit then dab it dry with a lint-free paper towel or cotton rag.
By the next day it's more than dry enough to clear coat over.
--------------------------------------------------------------------------
Final step
Grab a beer and your digital camera - show us how it came out.
--------------------------------------------------------------------------
If anyone's got a project and would like some decals without going through all that just ask me. No charge. (no full-on copyright infringement though)
Regular Fretter
Here are a few shots of the Strat-O-Killer, actually taken before the logo was put on. No real bearing on this thread, I'm just a little proud of her.
Lefty O'lman
Very good info, extremely nice Strat build!:
Thanks for posting both.
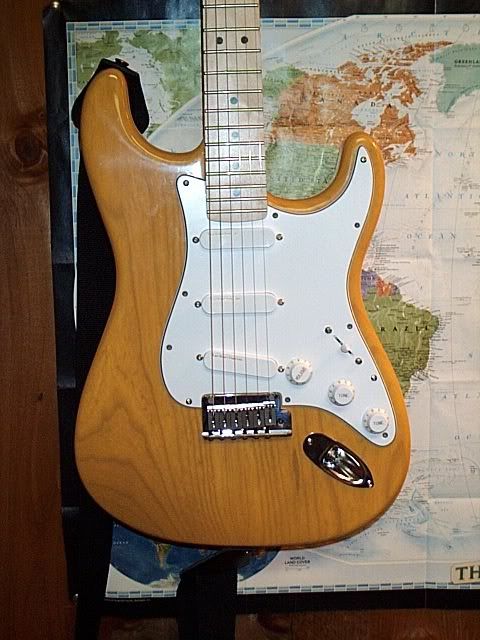
I especially like the woodgrain on that body, btw......nice!
Guitars
Wilburn Versatare, '52 FrankenTele(Fender licensed parts), Fender USA Roadhouse Strat, Fender USA Standard B-bender Telecaster, Agile AL 3000 w/ WCR pickups, Ibanez MIJ V300 Acoustic, Squier Precision Bass,
Amps
Ceriatone Overtone Special, Musicman 212 Sixty-Five, Fender Blues Jr., Peavey Classic 30, Fender Super Reverb, Traynor YCV-40 WR Anniversary w/ matching 1x12 ext. cab, Epiphone SoCal 50w head w/ matching 4x12 cab (Lady Luck speakers), Avatar 2x12 semi-open back cab w/ Celestion speakers
Pedals
Digitech Bad Monkey, Digitech Jamman, DVM's ZYS, Goodrich volume pedal
Regular Fretter
Thanks Dreadman this will be very helpful. Is that a one piece body on your Strat? It looks like it. That is one sweet Strat
M29
Banned
I like it... a lot!
Now build me a similar ultralight tele.
Regular Fretter
Thanks OG. I think everyone appreciates a nice piece of ash.
M29 - It's an '02 Fender USA Deluxe body and it's actually two pieces. Good seam though, even on the back.
I'll build ya a Tele Rocket. Say the word.
Banned
Hit my inbox.Originally Posted by Dreadman
I'll do a little research (options/choices)... regardless, it would have to be lightweight (chambered maybe) and 24-3/4" scale.
Maybe you can lay out a DIY scratch-build thread with it.
Regular Fretter
Regular Fretter
Dreadman, that's one nice Strat you have there. Can you tell us more about the tuners and nut? It looks like you have a roller nut on there. Did you install it?
Guitars:
Fender 2006 MIM Fender Stratocaster HSS in 3TS
Ibanez RG 570 with a bridge Invader
ESP M II Deluxe with a Tune-o-Matic bridge
Eleanor, the magical, mystical Road Worn wonder Tele
Blackstar HT Club 40
Regular Fretter
Wow Dread nice ash:

Hey let me know if I can help or donate parts for Rockets tele!!!!!:
"I love being alive and I will be the best man I possibly can. I will take love wherever I find it and offer it to whoever will take it... seek knowledge from those wiser and teach those who wish to learn from me."
"Develop your talent, man, and leave the world something. Records are really gifts from people. To think that an artist would love you enough to share his music with anyone is a beautiful thing."
Duane Skydog Allman
You come to a point in your life when you really don't care what people think about you, you just care what you think about yourself." - Evel Knievel
Regular Fretter
DREAD.....
Regular Fretter
Spectacular Strat Dread!
Thanks for the instructions, I'm sure that someone here will put them to good use!
I pick a moon dog.
Regular Fretter
The tuners are Schaller lockers (love 'em) and the nut is an LSR roller. My goal with this guitar was to closely reproduce a Strat Plus that blew me away many years ago. I did have to re-cut the nut slot for the LSR, as it's wider than a regular nut. Pretty easy to do it accurately with a milling machine available.
Here are the general specs:
Warmoth neck - 10"-16" compound radius, Jumbo frets
Schaller/Fender locking tuners
LSR roller nut
Fender American Standard bridge (2 screw type)
Fender American Deluxe body (2002) - Butterscotch Blonde stain w/clearcoat
Lace Sensor Gold pickups (6k, 6k, 13.2k)
Regular Fretter
I wondered why there didn't appear to be any strings wrapped around the post. Figured they were lockers, but I'd never seen 'em before. That LSR nut sure looks interesting to me... I think I know someone with the proper equipment to cut that slot. I'm sure not gonna do it, as I like my guitar neck and fingers quite a bit.
Guitars:
Fender 2006 MIM Fender Stratocaster HSS in 3TS
Ibanez RG 570 with a bridge Invader
ESP M II Deluxe with a Tune-o-Matic bridge
Eleanor, the magical, mystical Road Worn wonder Tele
Blackstar HT Club 40
Contributing Member
Looks great Dread !
Regular Fretter
Thanks for the post Dread. I'll be using this in the near future for sure.
Great looking strat.
Chad
my guits
Addicted to solder....
Good set of instructions, Dread. I use waterslides on all my homemade pedals--they work great. Like anything, the quality of the results you get at the end is generally a direct reflection of the degree of planning upfront and the care taken in execution.
For anyone planning to use this method, be aware that light color graphics on decals over a dark background usually come out poor to worthless. Stick with dark graphics on a light-to-medium color surface and you'll probably be pleased with the outcome. The other thing you can do when decaling a dark surface is print to special white substrate decal paper, and then cut the decal out to the desired shape.
I've only used the inkjet type decal paper so far, and even with careful clearcoating before the water-soak, you can tend to get a little bleeding, but you usually have to look pretty closely to see it. I just ordered some laserjet decal paper for the first time, so I can try printing some decals on one of the color laser printers here where I work. Anxious to see how they look vs. the inkjet type.
DVM's Ever-Expanding Gear List:
Guitars - W-A-A-A-Y-Y too many to list. Check 'em all out HERE
Amps & Cabs - "Kap'n Kerrang-aroo" BYOC 18W TMB kit amp head; Mojave Coyote head; Fender Hot Rod Deluxe Lacquered Tweed Ltd. Ed.; Allen Sweet Spot kit amp; BYOC Tweed Royal kit amp; Epiphone Valve Jr. combo + mods; Drive 2x12 cab / Celestion G12M Greenback + G12H30; AB Custom Audio 1x12 cab / Celestion Alnico Blue
Pedals/Effects - ZILLIONS, including DVM's Home-built Pedals - See some HERE and HERE, TOO!
DVM's Gear Photos
Visit MY WEBSITE!
Regular Fretter
Good info DVM. I forgot that water caused some bleeding too.
Ya know what's funny? I've been wondering how you labeled the pedals. They looked too good to be waterslide and I figured you were into silk screning. LOL
Addicted to solder....
Well, mediocre photography can hide a multitude of sins!
DVM's Ever-Expanding Gear List:
Guitars - W-A-A-A-Y-Y too many to list. Check 'em all out HERE
Amps & Cabs - "Kap'n Kerrang-aroo" BYOC 18W TMB kit amp head; Mojave Coyote head; Fender Hot Rod Deluxe Lacquered Tweed Ltd. Ed.; Allen Sweet Spot kit amp; BYOC Tweed Royal kit amp; Epiphone Valve Jr. combo + mods; Drive 2x12 cab / Celestion G12M Greenback + G12H30; AB Custom Audio 1x12 cab / Celestion Alnico Blue
Pedals/Effects - ZILLIONS, including DVM's Home-built Pedals - See some HERE and HERE, TOO!
DVM's Gear Photos
Visit MY WEBSITE!
Posting Permissions