Reply With Quote
Pictures...

 Leggo of my HoHo!

Well, I've been working on yet another Strat project, and I thought I'd start posting the progress.
I ordered the body from KnE Guitars in California. I had noticed that KnE's guitar bodies were pretty reasonably priced, and the limited feedback I was able to find seemed pretty positive, so I thought I'd give them a try.
I e-mailed Mitch at KnE and gave him my specs for the body. Pretty straight forward - two piece alder body, S/S/S pickup route, routed and drilled for a vintage 6-screw mount bridge, 11-hole pickguard...
But I also wanted a lightweight body in the 3 lb. 6-10 oz range, and that usually is an upcharge with most body makers. Mitch just said, no problem, he usually kept a few lightwight blanks around for just such requests...same price. Mitch said the body would be around 3lb.- 9oz when finished. Now, the price of the body was only $109.95, which is an excellent price for a two piece alder body made to any specs I wanted. The additional benefit of getting it in a light weight with no upcharge closed the deal.
I PayPal'd the money to Mitch on a Thursday, and he had the body finished and shipped out the next day....pretty remarkable!
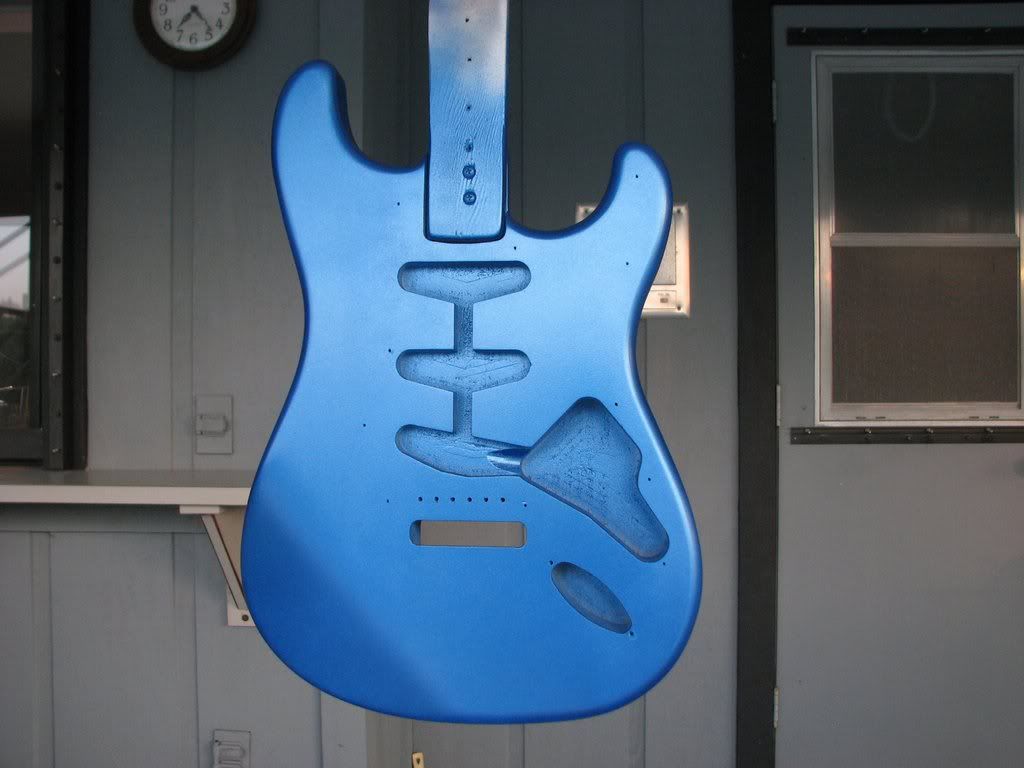
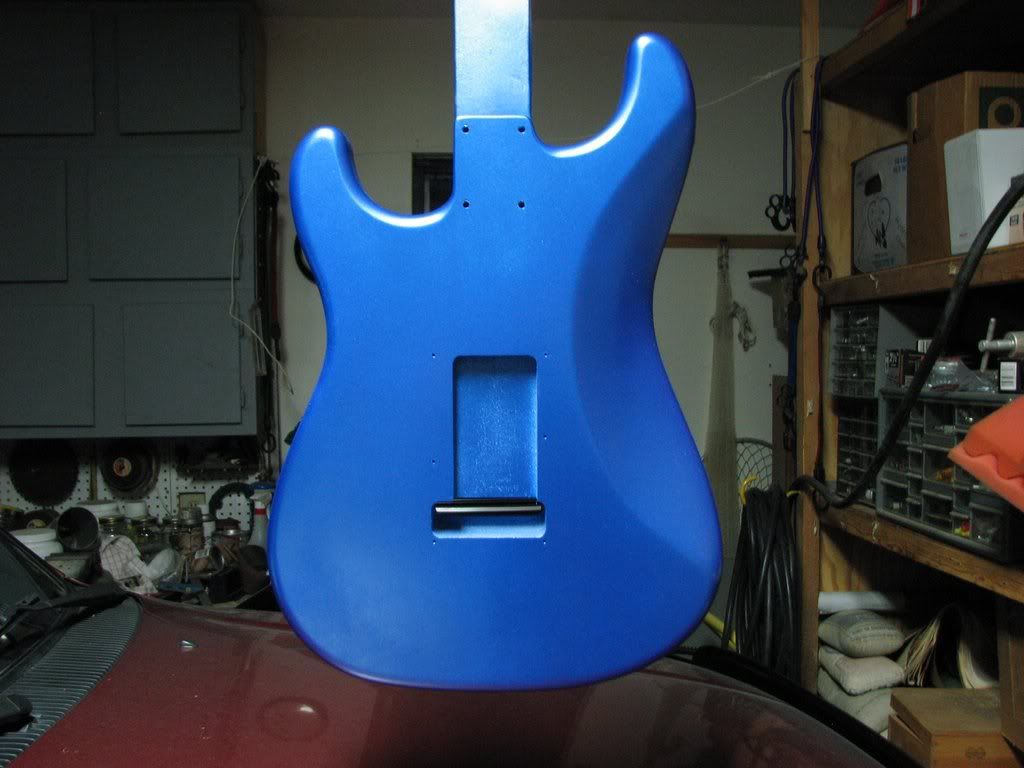
When the body arrive the next week, I pulled it out of the box for it's initial inspection. The work was neat and precise, and the body was sanded down to a ready to prime/paint smoothness. The weight of the body was just a hair over 3lbs 9oz. I have a USACG body that I use as my "template" for comparing any other guitar bodies I buy, so I pulled it out for a comparison. The USACG body for reference, was patterened from an original 1954 Strat body that Tommy at USACG owns himself. The only variance from the original is a deeper pickup cavity route to accomodate the generally taller modern pickups.
I compared the overall size of the two bodies, and they appeared identical. The horns on the KnE were slightly more rounded than the USACG, but subtley so, and not something you'd notice if the KnE body was standing alone. When I got to the forearm contour and the rear relief contour, I noticed the first real differences. The forearm contour was not as pronounced nor as wide, and the rear relief contour was not as long nor as deep as on the USACG body. So, I decided that it would be worth the extra effort to further relieve these contours. First, I marked the center point of the body at the lower end, then I used a straight edge and a pencil to draw a line from the center point to the side edge of the body where the contour should end. From there, it was just a matter of relieving the wood until the contour matched the USACG body. I did the initial relief with a belt sander, and finished it up with hand sanding.
Next, I turned to the rear contour. No belt sander here as it would be just be too easy to slip and take too much wood off, or to alter the sweeping angle too much. So, I painstakingly hand sanded the contour until it matched the USACG body. In reality, it didn't take all that long to rough out the shape, but to finish the contour to that graceful looking contour of the USACG body took a little more time to get right. Still, all in all, it was time well spent. The only other alteration I did to the body was to add a relief cut in the bottom of the bridge pickup cavity where it meets the control cavity, to accomodate the wiring from the three pickups. When twisted together in vintage fashion, the wiring creates somewhat of a "lump" that requires some extra space beneath the bridge pickup (the USACG body has this relief cut). I'm sure that I reduced the weight of the body by an ounce or two, but the scale that I used initially to weight the body, was not readily available when I finished the sanding.
With the body alterations completed, I then began assembling the guitar so that I could get all of the holes drilled for the neck, pickguard, tremolo cover, strap buttons, as well as the holes for the tunning keys and string trees on the neck. The all critical scale length with the bridge and neck installed was spot on. Once I was satisfied with the assembly, I disassembled the guitar to prepare the body for the next step - the sanding sealer.
Since this body is made of alder which is a closed pore wood, no grain filler was necessary. I bought a quart of Deft lacquer sanding sealer (nitro) from Ace Hardware (the only place I can find it locally any more), and mixed up a quart with a 1 to 1 thinner to sealer ratio. I applied eight coats of the sander sealer with my touch up spray gun, sanding the body between the first four, and the last four coats. I then final sanded it to a smooth finish.
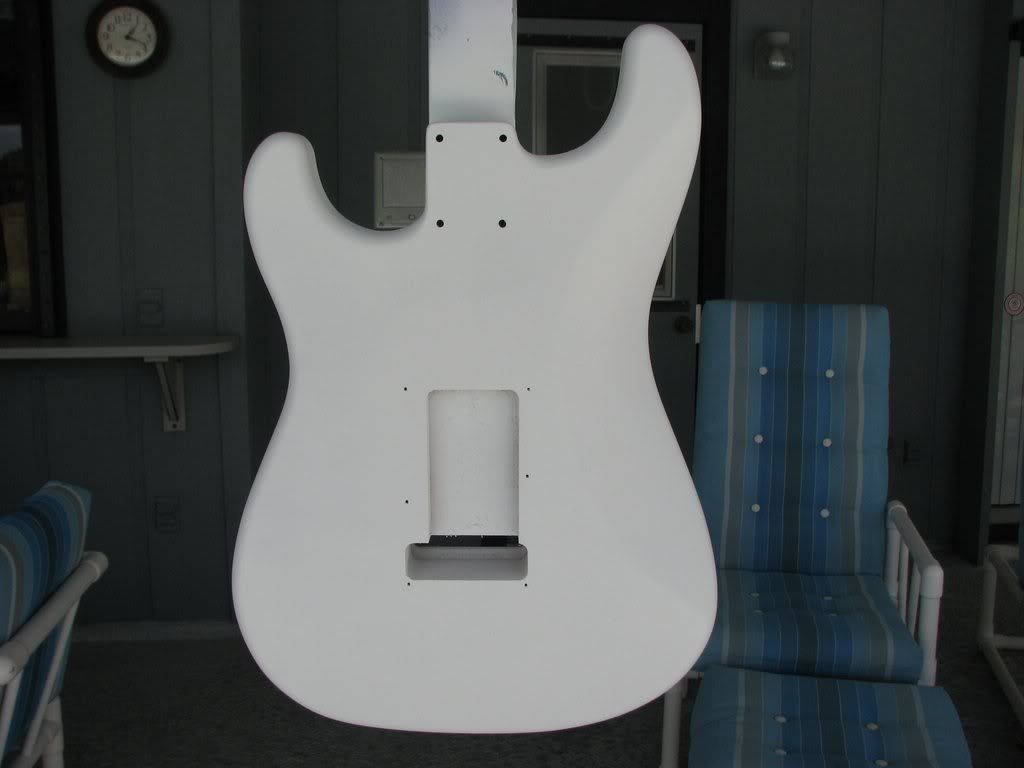
Since this guitar will be finished in Lake Placid Blue metallic lacquer, the next step was to apply a white primer as a base for the paint. This is a step that is sometimes skipped, and even Fender did so a lot in the vintage years. But, a good base of white primer serves two useful purposes: 1) The paint goes on much more evenly without any dark or light areas. 2) It requires less paint to finish the job. Rather than order some flat clear lacquer and white pigment to make the primer, I just picked up two spray cans from Guitar ReRanch. It's easy and convenient to use, especially with one of the spray can handles that you can pick up at Home Depot. Plus, there's no clean up of spray equipment after each spraying session. I applied four coats of the primer, and after 24 hours I sanded it down. I got about four minor sand through spots on the body, so I applied another four coats to these affected areas.
This is where the project stands at this point. The body is hanging up in drying mode, to be final sanded this evening. I'll post more on the next steps of the process as I get to them, along with posts on the neck finishing after I take some pictures of that progress.
Body pictures in the next frame....
Leggo of my HoHo!
Pictures...
Addicted to solder....
Lookin' good thus far, BC! Can't wait to see how the Lake Placid blue metallic looks over it! Keep those progress pics comin'!:
DVM's Ever-Expanding Gear List:
Guitars - W-A-A-A-Y-Y too many to list. Check 'em all out HERE
Amps & Cabs - "Kap'n Kerrang-aroo" BYOC 18W TMB kit amp head; Mojave Coyote head; Fender Hot Rod Deluxe Lacquered Tweed Ltd. Ed.; Allen Sweet Spot kit amp; BYOC Tweed Royal kit amp; Epiphone Valve Jr. combo + mods; Drive 2x12 cab / Celestion G12M Greenback + G12H30; AB Custom Audio 1x12 cab / Celestion Alnico Blue
Pedals/Effects - ZILLIONS, including DVM's Home-built Pedals - See some HERE and HERE, TOO!
DVM's Gear Photos
Visit MY WEBSITE!
Contributing Member
Nice! I would like to build one one day!
Steve Thompson
Sun Valley, Idaho
Guitars: Fender 60th Anniversary Std. Strat, Squier CVC Tele Hagstrom Viking Semi-hollow, Joshua beach guitar, Martin SPD-16TR Dreadnought
Amphs: Peavey Classic 30, '61 Fender Concert
Effects and such: Boss: DS-1, CE-5, NS-2 and RC20XL looper, Digitech Bad Monkey, Korg AX1G Multi-effects, Berhinger: TU100 tuner, PB100 Clean Boost, Line 6 Toneport UX2, Electro Harmonix Little Big Muff Pi, DuhVoodooMan's Rabid Rodent Rat Clone, Zonkin Yellow Screamer Mk. II, MXR Carbon Copy Delay
love is the answer, at least for most of the questions in my heart. . .
- j. johnson
Leggo of my HoHo!
OK, time for the next installment...
I sanded the primer coat and wiped the body down with Naptha. Now for the first two coats of Lake Placid Blue paint. For those who've wanted to try painting a body with the lacquer from Guitar ReRanch, here's an opportunity to see how easy it is to use these spray can lacquers.
I bought two cans of the Lake Placid Blue some time ago, and even though I've since found a formula for mixing my own, I wanted to use these cans up first. Metallic lacquers are sometimes thought to be "difficult" to apply, but they're really not any worse than most solid colors...with one notable exception. You must be VERY careful when sanding between coats. In fact, you should sand as little as possible, and just let the next coats burn in to the earlier coats. Then if the paint is fairly uniform, spray the clear top coats on and sand and polish those to the glossy finish. If you sand the color too much, the metallic flakes flatten out, and you loose the dimentional effect and sparkle. Another trick that's very useful is to go to The Home Depot and buy one of the Rust-O-Leum spray can handles for about $5.00. It makes spraying much more like using a gun.
Anyway, I started by spraying two coats on the edges of the body, front and back, and then I came back and sprayed the flat surfaces. Before finishing, I added another coat to the edges. Here's how the first two coats turned out:
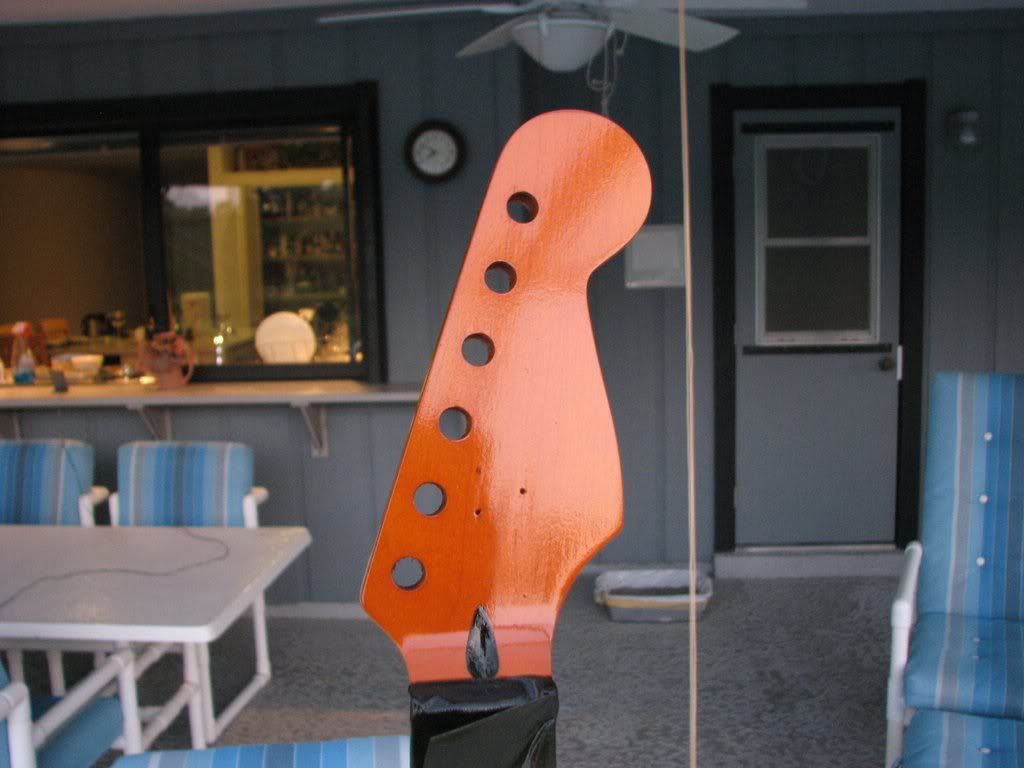
I then put the final coats of neck amber lacquer on the neck I'll be using for this guitar. This I did with my touch up gun and compressor. Clear lacquer with Stew-Mac amber tint, cut 1 to 1 with thinner:
After I finish wet sanding the neck down, I'll spray on about 10 coats of clear lacquer before the final wet sanding and polishing. I can't believe my luck with the weather during this. It was 76 degrees F with a humidity of 38% tonight while I was painting. This is almost unheard of this late in April here in Florida. At least as far as the low humidity goes, anyhow.
Regular Fretter
Blooz, that is going to be one red hot mama! The Lake Placid Blue is simply gorgeous! You're doing a GREAT job! Keep it up!
Can't wait to see her finished!
Regular Fretter
man that is really looking sweet
great job....keep those updates coming!
ww
Guitars: Gibson 1998 Les Paul Special : Peavey Predator (Early 90's Fat Strat Copy) : Ibanez GAX30TROriginally Posted by just strum
Brownsville Reso - 101 Electric Reso : Fender GDO-300 Maple Quilt Top Acoustic
Amps: Fender Super Champ XD
Effects: Digitech RP250 Modeling Guitar Processor : DVM "Phased and Confused" Script Phaser Clone : Digitech Bad Monkey
Danelectro Cool Cat Chorus : Behringer Distortion Modeler : Ernie Ball Volume Pedal : Dunlop Cry Baby Wah
Regular Fretter
Oh man Blooz that is looking awesomeMighty fine work going on there. That color is going to look great. Do I see a white pearl pickguard going on that baby?
M29
Leggo of my HoHo!
Well M29, despite my suggestions that you go with a white pearloid pickguard on your red Hwy 1 Strat, I'm going with a plain white one on this guitar. I had a white pearloid pickguard, but I used it on the transparent blue ash strat I put together. I had this white one laying around, so I decided to use it on this guitar.
As much as I love that white pearloid look, I really want to go with the traditional 1960-1962 Strat look...and those had the plain white pickguards and trem cover. With a soft V amber tinted neck, it seemed only right. The only visual departures from the '60-'62 look, are the tuners, which are a modern Gotoh sealed mini tuner (that I also had left over from the dis-assembled old LPB Strat that I told you about) and the headstock truss rod adjustment. Otherwise, it'll look just like one of the originals when it's through.
I'm also in the middle of re-doing my Koa Strat clone. Now that one has a beautiful figured Koa top and straight grained Koa back. And it has a beautiful black pearloid pickguard and trem cover to go along with the all gold hardware. That one will actually be done before this Lake Placid Blue one, as the body and neck are already buffed out and ready for assembly. All I have yet to do is to re-drill the holes for the tremolo bridge mounting. I had a two point Wilkinson tremolo bridge on it before that I really didn't like at all, and I had to plug those holes and now re-drill for the new bridge. The original finish I had done on the guitar was an oil finish that had an open pore, furniture like look. Now it's a beautiful, shiny lacquer finish
I'll post some pics of the Koa Strat when it's all back together in a couple of days. It's my one and only true showcase Strat. I'm really more of a function over form kind of guy...classic, clean, simple, and functional has a beauty all it's own...
But I still think that with your Hwy 1 being a modern looking Strat, a pearloid pickguard would look really great...just like my modern trans blue ash Strat does with one...
Leggo of my HoHo!
Another fine afternoon for spray painting....
I added four more coats of lacquer. I'm not posting any pictures since they really wouldn't look any different than those of the first four coats of LPB.
I'll lightly wet sand the finish Friday evening, then add a two more coats as wet as I can on Saturday. After that, it'll be clear coats for the rest. I'll wet sand the neck on Friday as well, then clear coat it along with the body.
Things are progressing nicely...
Contributing Member
That project is sure looking nice!
Steve Thompson
Sun Valley, Idaho
Guitars: Fender 60th Anniversary Std. Strat, Squier CVC Tele Hagstrom Viking Semi-hollow, Joshua beach guitar, Martin SPD-16TR Dreadnought
Amphs: Peavey Classic 30, '61 Fender Concert
Effects and such: Boss: DS-1, CE-5, NS-2 and RC20XL looper, Digitech Bad Monkey, Korg AX1G Multi-effects, Berhinger: TU100 tuner, PB100 Clean Boost, Line 6 Toneport UX2, Electro Harmonix Little Big Muff Pi, DuhVoodooMan's Rabid Rodent Rat Clone, Zonkin Yellow Screamer Mk. II, MXR Carbon Copy Delay
love is the answer, at least for most of the questions in my heart. . .
- j. johnson
Regular Fretter
hey blooz, nice project, I like it, what do you use to finish it?
"the emperor is rich, but he cannot buy another year"
-anonymous chinese person
"the thief is sorry for being hung, not for being a thief"
-anonymous
"We are not nationalities, we are not races, we are not political parties, we are not social classes, we are not cultures, we are not subcultures, and we are not churches, but when all things are said and done, the guns are shot, the riots have died down, one thing is true, and that should preceed all other things, we are, without division: HUMAN BEINGS, is that not good enough an excuse stop shooting people, and letting others starve to death?" -Pie_man_25
Leggo of my HoHo!
Even though I now have a formula for mixing my own lacquer in this color, I used this because I had it already:
http://reranchstore.stores.yahoo.net/lakplacblume.html
I'm using McFaddens clear lacquer for the top coats. I'm spraying that with one of my spray guns. I did 4-coats of clear yesterday, out of the 10 total that I plan to use.
Leggo of my HoHo!
OK, so I sprayed 4-coats of clear lacquer on the body yesterday. I didn't bother taking any pictures though, because they wouldn't look much different than the previous ones. A ltttle glossier, but that's about it.
So, I though I'd post some pictures of some of the equipment I use to spray paint. When I started out, I wanted to try to get an adequate rig that would allow me to spray guitar bodies and necks. I wasn't interested in painting big things like cars, so an 8-gal., 120 PSI compressor would be adequate. Since I have a Harbor Freight Tool outlet near me, I just waited until it was on sale for $99.95 (Reg, $159.99) and added it to my list for Santa Claus that year (about four years ago). Here's the compressor:
I then set about looking for spray guns. My friend Pat O'Donnel at Resurrection Guitars gave me the best advice in buying a spray gun. He said to just go down to The Home Depot and buy one or two of the Taiwanese Binks knockoffs. He has three that he's been using for years, and they're great quality for the money. Well as it turns out, Harbor Freight had the very same Taiwanese spray guns, and they put them on sale every so many months. So, I bought a $29.99 industrial production type gun on a super sale for $9.99, and a $19.99 touch-up gun on sale for $8.99. Then this weekend I bought this $14.99 gravity feed, mini detail gun to do sunburst finishes for only $7.99:
And then I needed to pick up a good in-line regulator/filter to make sure the air was free of water and other impurities. This unit sells regularly for $39.99. I picked it up for $19.99:
All of these items are made from metal/steel/stainless steel - no plastic. They're all quite robust and surprisingly well made given the prices I paid. The items I listed here cost me a total of $146.95 +tax. Not bad for all I got. To get started you'd only really need the compressor, the touch up gun (which can handle all the spraying on bodies and necks), and the filter/regulator. That's a grand total of $128.97 + tax. You'll also need a couple of hoses, but they can be bought on sale for $4.99 ea., and you'll need some brass fittings. Those will run you about $8.00 - $10.00, tops. Oh, and one small but important addition - a respirator. A decent one that can handle organic compounds will run about $37.95 (nitro lacquer is a Volitile Organic Compound), but they can be bought on sale as well.
So, for anyone who has been thinking about getting into spray painting, but thought the cost of equipment was prohibitively expensive, it's really not. You just have to be patient, wait for the sales, and buy when you can afford to. And, get on Harbor Freight's e-mail list too. Some of the items I've listed are on sale right now, but not for what I paid for them. When you're on the e-mail list, you get coupons that you can print out that bring the prices way down.
Rock On....
Posting Permissions