Warning: preg_replace(): The /e modifier is deprecated, use preg_replace_callback instead in ..../includes/class_bbcode.php on line 2958

Warning: preg_replace(): The /e modifier is deprecated, use preg_replace_callback instead in ..../includes/class_bbcode.php on line 2958

Warning: preg_replace(): The /e modifier is deprecated, use preg_replace_callback instead in ..../includes/class_bbcode.php on line 2958

Warning: preg_replace(): The /e modifier is deprecated, use preg_replace_callback instead in ..../includes/class_bbcode.php on line 2958
NGD - Vintage Australian Guitar Conent ;)
Results 1 to 15 of 15

Thread: NGD - Vintage Australian Guitar Conent ;)

  1. #1
    Join Date
    Jun 2008
    Location
    Down Under
    Posts
    1,706
    Post Thanks / Like

    Default NGD - Vintage Australian Guitar Conent ;)

    So I've taken on a bit of a project to fix up a vintage guitar I came across at the right price.

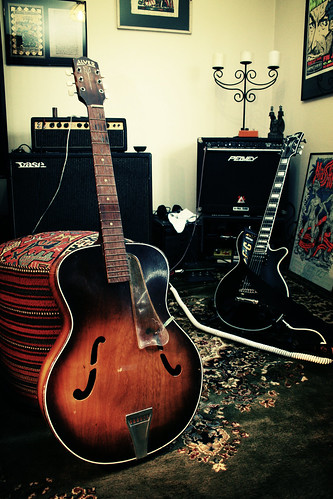
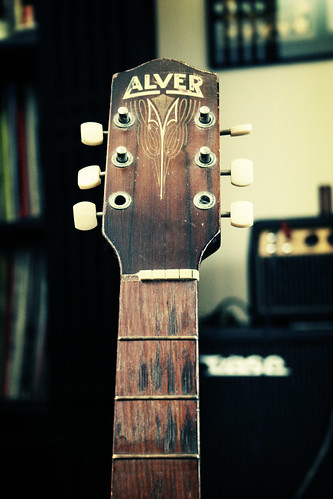
    It's an early '60's (as far as I can tell, they didn't have serial numbers....) Alver arch top. Alver was the "student" brand Maton Guitars used for a while. The story goes that although they were "no-frills" designs, they were still built by the same guys that built the flagship models, so they became cost ineffective and where phased out. That's what I hear anyway.

    I was getting impatient of myself to take the pic's so you cans see where i tried some fret board oil


    Alver "Before Shots #3" by Ch0jiN, on Flickr

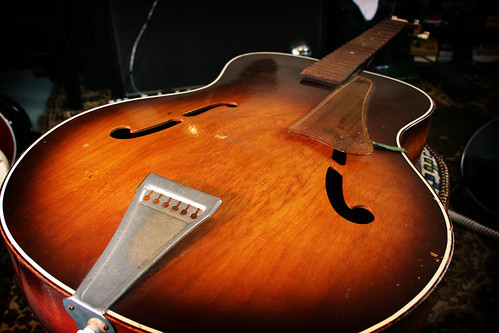
    This is how I picked it up. It's missing the bridge and two peg heads from the tuners, but apart from that it appears to be completely original.


    Alver "Before Shots #1" by Ch0jiN, on Flickr


    It looks to have a bone nut, but it's trashed and I'll replace it with unbleached bone.

    You can probably see some of the tuning keys are bent too. I'm actually going to replace all of them with some from stewmac that look almost identical and keep these ones away somewhere.


    Alver "Before Shots #2" by Ch0jiN, on Flickr

    Here you can see where someone has clearly tried to prise the bridge off with a jackhammer at some point....


    Alver "Before Shots #5" by Ch0jiN, on Flickr

    So here you can see the clear (well, 'clear' is overstating it, it's actually heavily yellowed with age) pick guard with the engraved ship that I'm told identifies this guitar as particularly rare amongst a very rare breed.

    The plastic though has gone quite soft and spongy though so I'm considering replacement options. Maybe matte black on white with the same design engraved.


    Alver "Before Shots #8" by Ch0jiN, on Flickr

    Makes me thirsty just looking at the fret board...

    Given the staining, it's been played some. But, the first three frets are barely dented so I plan to keep them.


    Alver "Before Shots #7" by Ch0jiN, on Flickr

    There is some nasty fret sprout though as the neck has clearly dried out some over the years. I would like to keep the original frets, so I'm planning on gluing the ends back down and filing the offenders back down. It'll need a level and crown too.


    Alver "Before Shots #6" by Ch0jiN, on Flickr

    Last but not least, the neck joint is slightly loose. There's probably 1mm wiggle up and down. Sideways is rock solid. I'm not sure how I'll proceed there, but I'll get the tuners and bridge on, string it up and see how it all looks first.

    I am planning on electrifying her too, but in a non-invasive way. I'll put a slim floater up at the neck and install a strap jack. I'll likely add stealth thumb wheel volume and tone under the new pick guard too.

    Anyway, here's one more in B&W so you can see the unusual grain in the top.


    Alver "Before Shots #4" by Ch0jiN, on Flickr

    Well, I hope you dig it and if you do, I'll keep you posted on the restoration because there might just be another really beat up piece of Australian music history on it's way to me.....

  2. #2
    Join Date
    Jul 2007
    Location
    Plymouth, MA USA
    Posts
    2,077
    Post Thanks / Like

    Default

    Nice looking wood there all around - this should be a fun project, Chojin, bringing her back to life and giving her her voice back! I bet it'll be exciting when you get it all done, string her up, and hear her for the first time. Good luck - keep us posted.

  3. #3
    Join Date
    Feb 2008
    Location
    Mulhouse Alsace (France)
    Posts
    1,066
    Post Thanks / Like

    Default

    Great project I'm sure you will get an astonishing guitar at the end of the day ! I'm still a bit skeptical about keeping the old frets in place but you have a much better view of the whole thing ! All the best
    Guitars:
    1978 Fender Telecaster Thinline Custom USA, New Nash TL-72 Thinline Telecaster, 1965 Harmony Meteor, H71, 1986 Fender Telecaster Esquire MIJ, New Martin J-41 Special, 1933 National Duolian, 1941, New Eastwood Mandocaster 12 strings

    Amps:
    Tweed Vibrolux Custom Denis Manlay, 1976 Fender Deluxe Reverb Silverface

  4. #4
    Join Date
    Jun 2008
    Location
    Down Under
    Posts
    1,706
    Post Thanks / Like

    Default

    Thanks guys!

    Jipes, can I ask why you would replace the frets? Obviously new frets would cure the fret sprout and give me some more fret height to work with, but I was thinking in terms of vintage value, repairing the originals would be a better idea as long as it still ends up playable.

    The worst victims of the "Sprout" were past the 12th fret (the frets that go over the body), and considering you cant really slide your hands up that far (and if you could you'd slice your fingers up) I had a shot at repairs there first. A little dab of CA at the fret end, then clamp the fret down for a while. Remove clamp and file the excess fret material down and shape the ends. It's actually really easy (although I'd never try it with a bound fret board).

    I don't know how long it's been since it had tension on the neck (it has been in a cold storage room of all places, for 3 years) but I threw a straightedge at it and I found two things. One, the fret board doesn't appear to be radiused (sp). It's dead flat from a horizontal perspective. I think this will make fret leveling super easy. Second, the fretboard is straight and true and has barely 1mm relief. Not even room for a business card between a straightedge at 12th fret.

    I mentioned the neck joint was/is a little loose. Just for giggles I gave the neck a little love tap upwards to see if it would pop off. It didn't, but it firmed the joint right up. So I then decided to let the whole guitar live in my bathroom for the weekend to soak up some moisture, and bam! The neck is rock solid again. I'll leave it be until I get the new hardware on her and see how the action looks before I do anything else to the neck angle/height.

    I'm expecting a care package from StewMac in the next few days, so more updates soon!

  5. #5
    Join Date
    Feb 2008
    Location
    Mulhouse Alsace (France)
    Posts
    1,066
    Post Thanks / Like

    Default

    Quote Originally Posted by Ch0jin View Post
    Thanks guys!

    Jipes, can I ask why you would replace the frets? Obviously new frets would cure the fret sprout and give me some more fret height to work with, but I was thinking in terms of vintage value, repairing the originals would be a better idea as long as it still ends up playable.
    All depends if you think that you can really play it with the actual frets ?

    I don't think the vintage value resides in the frets of a neck but rather to his integrity in terms of the body, the hardware and the pickups
    Guitars:
    1978 Fender Telecaster Thinline Custom USA, New Nash TL-72 Thinline Telecaster, 1965 Harmony Meteor, H71, 1986 Fender Telecaster Esquire MIJ, New Martin J-41 Special, 1933 National Duolian, 1941, New Eastwood Mandocaster 12 strings

    Amps:
    Tweed Vibrolux Custom Denis Manlay, 1976 Fender Deluxe Reverb Silverface

  6. #6
    Join Date
    Jul 2007
    Location
    Plymouth, MA USA
    Posts
    2,077
    Post Thanks / Like

    Default

    I think that Jipes is right - consider that an old guitar continuously played may have had several refrets it its lifetime.

  7. #7
    Join Date
    Jun 2008
    Location
    Down Under
    Posts
    1,706
    Post Thanks / Like

    Default

    Thanks guys, very good point. I guess my thinking was/is also influenced by the fact that I am confident I can dress up these frets, but I'm not really setup for a full re-fret. For now, the plan will be to get it strung up and see how it plays and take it from there. If there's not enough meat on the frets, I'll have to take it to a shop I guess. I'm hoping to have my StewMac care package before the weekend so I can at least get a bridge and tuners on her and see what it looks like.

  8. #8
    Join Date
    Jun 2008
    Location
    Down Under
    Posts
    1,706
    Post Thanks / Like

    Default

    OK, a brief update with pictures to follow, and a thought that maybe I should move this thread to repairs and mods.......

    So I received my package of goodies from StewMac yesterday and discovered a couple of things. Firstly, not all vintage tuner peg spacings are the same

    Whilst the Golden Age Restoration tuners look almost exactly the same as mine, I really should have measured the spacing, because a little over $50 later, I can't use them. A major annoyance, as the reliced bronze ones I have look amazing, and would have been perfect for this job. I think I'm going to be forced to use something quite different from the original style which will give me much improved functionality, but won't look as original.

    So then I popped the StewMac rosewood bridge on and threw a couple of strings on to see what the neck angle, and subsequent action was like. Not good.

    The neck is dead straight which is ace, but like (most?) guitars this old, the neck angle is all squished up (technical term) so the action at the 12th fret is about 3/4" or more. Essentially unplayable unless you want to rock open chords all day.

    Now for the good news!

    Even with just two strings on it, it sounds great! It has sustain for days! More than I expected to be honest.

    The next bit of good news was the neck joint. It felt a little loose when I picked up the guitar, so I thought I might be able to avoid that whole messy "remove a fret and drill a hole and inject steam etc" process.

    And I did!

    A couple of careful, but solid thumps with a rubber hammer right on the heel and "pop!" Off came the neck. Hurray for ancient glue!

    So now as I leave for work, I have to try and find some little hardwood off cuts from somewhere so I can work on cleaning, shimming and re-setting the neck. It's going to be a bit of work, but I think having a nice old guitar with great action is worth the woodwork

    Pics and updates to follow

  9. #9
    Join Date
    Jul 2007
    Location
    Plymouth, MA USA
    Posts
    2,077
    Post Thanks / Like

    Default

    Congrats on the success so far - that neck removal step must have been a little hair-raising!

  10. #10
    Join Date
    Jan 2012
    Location
    Sweden
    Posts
    146
    Post Thanks / Like

    Default

    Very nice! I'm a sucker for anything maritime, I love the pickguard!

  11. #11
    Join Date
    Jun 2008
    Location
    Down Under
    Posts
    1,706
    Post Thanks / Like

    Default

    OK here's some more pics.

    The neck is removed from the guitar in this shot to show the fret sprout on the last few frets. I'm going to glue and clamp them and see how I go.


    Fret Sprout by Ch0jiN, on Flickr

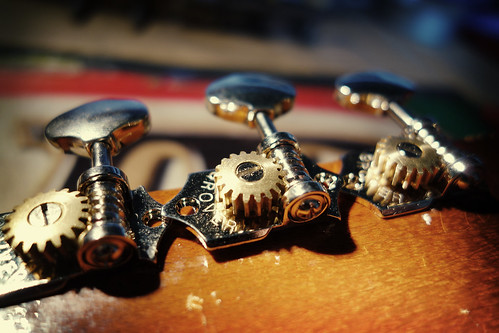
    Now here's the problem with the replacement tuners. The brass one on the bottom has a slightly wider string post spacing. Such a shame, because I think you'd agree, they would look amazing as replacements.


    Tuners by Ch0jiN, on Flickr

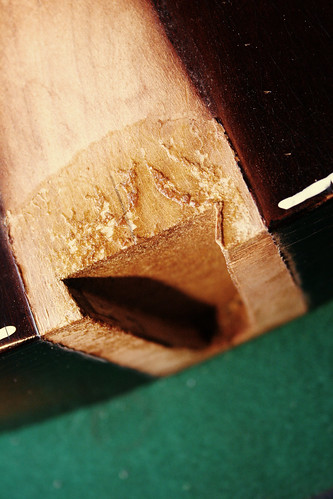
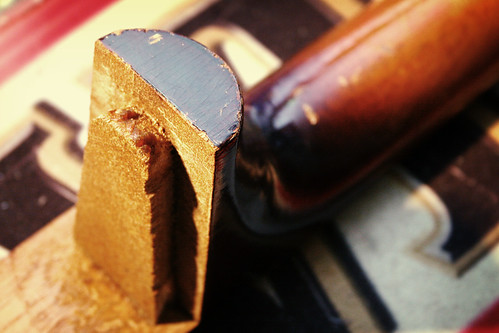
    The neck joint. Looks like it was made pretty well, even if it does appear to have two shims from new. Minimal glue, which has completely worked in my favour.


    Dovetail by Ch0jiN, on Flickr

    The neck part of the dovetail joint. You can see a couple of chips where the glue seems to have held, but nothing to be worried about.


    Neck Joint by Ch0jiN, on Flickr

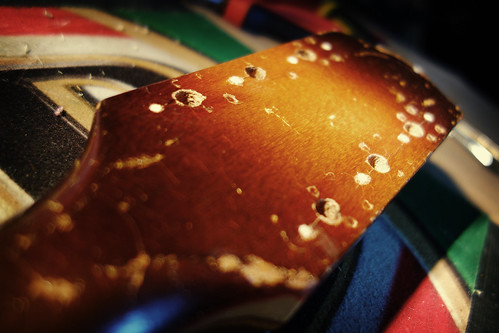
    Now here's a question. At first I thought the pick guard was originally clear and had yellowed with age. But on closer inspection, do you think it might have been a tort pattern that's faded massively? That stain isn't painted on. It looks like its inside the guard material.


    H'mmmm by Ch0jiN, on Flickr

  12. #12
    Join Date
    May 2007
    Posts
    5,018
    Post Thanks / Like

    Default

    I'm looking forward to seeing your progress through this project. It looks like it was once and will once again be a beautiful instrument.

  13. #13
    Join Date
    Jun 2008
    Location
    Down Under
    Posts
    1,706
    Post Thanks / Like

    Default

    So a little update from the weekend.

    No new pics just yet, because frankly, I wasn't really inspired photographically by a whole bunch of filing and sanding and freaking out and then being calm again.

    So, "hardwood" lives up to its name doesn't it. I'm not sure what the neck is made from, but it smells nice, and looks like it could be mahogany, but it's tough going with a file and sandpaper when you're trying to be delicate. File, sand, refit neck, check. Repeat seventy billion times.

    If you are reading this thinking "I could totally do that", please seriously consider doing it on a guitar you don't care about as practice first. I think I'm all good, I've taken away enough material, and critically, at the right angle, to get what I hope to be a great action with decent range of adjustment. I might even get a good looking joint yet. But there was plenty of stress knowing I could remove, but never replace if I went too far.

    So now the neck joint is very loose, due to removing up to around 2mm of wood (I know it doesn't sound like much, but it took an age) so I'm measuring up the shims I'll need to ensure the neck is a firm fit in the pocket (which I didn't touch a apart from glue removal). This was always going to happen though so I'm prepared. I've glued slivers of bamboo to parts of the neck joint and am sanding them down to thickness (again, sand, refit, sand, refit, sand, refit) to determine exactly where I need to shim for best results. I'm using bamboo to figure it out, as it's far easier to sculpt quickly. When I'm satisfied I know how and where to shim the neck joint, I'll replace the bamboo shims with hardwood before re-gluing the neck. I don't know what wood yet, but something less squishy than bamboo anyway.

  14. #14
    Join Date
    Jun 2008
    Location
    Down Under
    Posts
    1,706
    Post Thanks / Like

    Default

    I spent some time fine tuning (and by "tuning", I mean "sanding") the neck angle this morning. I think I have it spot on now, which means the next step is gluing it back in place. A step I'll admit is just as scary as the sanding itself.

    I'm pretty happy with my work so far too. The chipped nitro makes it looks worse than it is, but that's a pretty tight joint again now. Depending on how it looks after I glue it, I might try and melt the edge of the nitro with acetone so it doesn't look so recently butchered


    I figured it would make sense to shape the bridge at this point too. No point fine tuning the neck angle if the bridge drops a few mm when it's shaped to the body. Adding to the things I've learned fixing up this guitar is the fact that Rosewood doesn't smell as nice as Mahogany, but it still smells nice when you sand it


    So now I'm debating whether or not to glue the neck before I replace the tuners and nut, or after. I think "after" might win out, purely because without the nut and new tuners, I cant string it up completely and check I have the neck angle perfect.

    So that's the update for now!

  15. #15
    Join Date
    Jun 2008
    Location
    Down Under
    Posts
    1,706
    Post Thanks / Like

    Default

    OK time for more updates!

    After discovering the tuners I wanted to use would not fit (see above), I went for my second choice, a set of 18-1 Grover Sta-Tite tuners.

    Of course it was way too much to hope for them to be a drop in replacement, as you can see here:


    Overlap by Ch0jiN, on Flickr

    Luckily the base plates are quite soft, so a quick file and I could drop them all in and see how it looked. (Yes, they are crooked here, but before I screwed them in I made them dead straight)


    Test Fit by Ch0jiN, on Flickr

    The original screw holes were both too wide and in the wrong spot, so I had to sort that out.

    After going through a box of large matches, carefully inspecting each one for the best grain pattern, and then tapping each one to find the most resonant wood, I dropped some PVA+ in the holes and hammered the matches in.


    Plugged by Ch0jiN, on Flickr

    After a few hours I came back and shaved the plugs down with a razor blade.


    Filled by Ch0jiN, on Flickr

    One thing that did go in my favour was the bushings. I didn't really fancy the ones that come with the Grover's, so I left the originals in place, and they seem to work just fine. (I've actually finished with the tuners, dry fitted the neck and strung it up to check everything pre-glue, but that's my next post....)

Posting Permissions

  • You may not post new threads
  • You may not post replies
  • You may not post attachments
  • You may not edit your posts
  •