Warning: preg_replace(): The /e modifier is deprecated, use preg_replace_callback instead in ..../includes/class_bbcode.php on line 2958
Warning: preg_replace(): The /e modifier is deprecated, use preg_replace_callback instead in ..../includes/class_bbcode.php on line 2958
Warning: preg_replace(): The /e modifier is deprecated, use preg_replace_callback instead in ..../includes/class_bbcode.php on line 2958
Warning: preg_replace(): The /e modifier is deprecated, use preg_replace_callback instead in ..../includes/class_bbcode.php on line 2968
Warning: preg_replace(): The /e modifier is deprecated, use preg_replace_callback instead in ..../includes/class_bbcode.php on line 2958 How to make waterslide decals
Several months back I built a fairly good quality Strat and ended up learning how to make waterslide decals (for the headstock). It's not hard at all and it's a nice personal touch when building your own instrument. A quick internet search turned up plenty of info on the basics but I learned a bit more from some trial and error.
If you don't know already, waterslide decals are the type of decals that come with some plastic model car kits. They're clear (except for the printing) and very thin so with a couple clear coats the edges disappear and it looks like a factory job.
Waterslide decal paper - can be found at any office supply store in packs of ten 8.5"x11" sheets or more. Lesser quantities can be found on ebay for short dough.
Graphics software - This can be as simple or complex as you have. I use a CAD program for work (computer aided drawing) and that has every conceivable option. Anything you can design and print with will work though. Even the Notepad program that's on every PC.
Printer - This will focus on inkjet printing but I believe there is waterslide paper that works with laser printing. The supreme printer is (I forget the name) the very expensive type that can use metallic ink cartridges. These run in the $500-$2000 price range and are the only way to get real silvers and golds (like many guitar manufacturers use). You can kind of fake it with an inkjet though.
I guess scissors and a shallow water pan are the only other things.
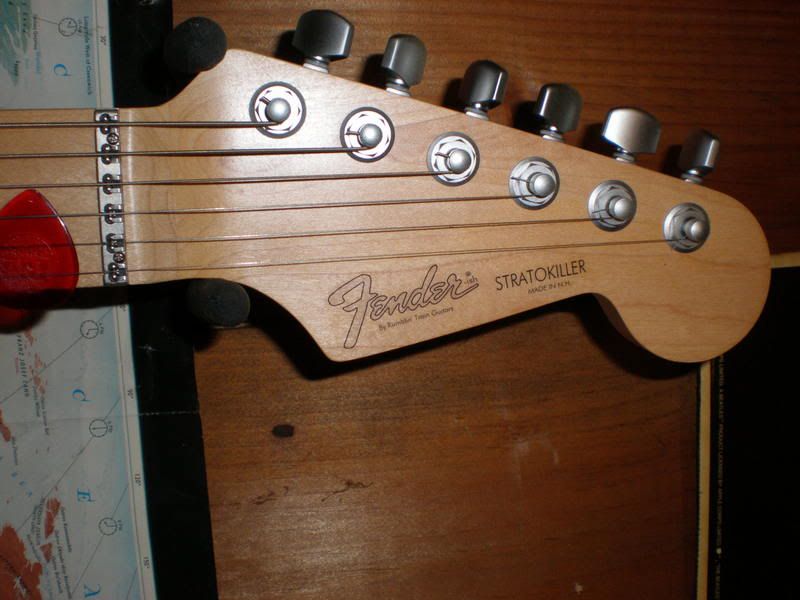
First you design your decal. For mine (shown below) I imported a photo of a Fender headstock logo into the CAD program (for reference) and carefully drew an exact replica. From there I changed it up a bit for personal preference. Once I had the design the way I wanted it I did a test printing on paper to see the actual size. I cut the test logo out and placed it on the headstock, then printed and checked it a couple more times until it was just right.
I'd say just play around in what ever program you use, you'll probably come up with some clever ways for getting what you want.
You may need to print a few, making color adjustments as you go. The waterslide paper is clear but it's on a (temporary) white paper backer so the printed colors will appear brighter than when the decal is over wood or paint. You can avoid wasting decal paper by printing a whole line of variations from left to right before cutting the sheet. That way you can print on the sheet again, as it will have straight ends. I did about four logos with different shades of gray (to mimic the silver in Fenders logo) across the sheet then cut out and test applied each one. The third darkest was the best match so I printed another row of four, this time all of them in the shade I liked. I figured it would be good to have extras.
I found out the hard way that inkjet ink runs when wet with any kind of solvent, including lacquer clear coat. I figured out that two or three VERY light dust coats of clear lacquer over the decal about ten minutes apart sealed the ink in very well. It could easily be lacquered over with the guitars final finish coat.
First thing is that wherever the decal is going should be clear coated or painted. You don't want to put a decal directly on wood. The decal should be the last thing in the finish layers before final clear coating. In my case I put it over the final satin clear coat so I can change it later if desired. It's not as durable but that doesn't bother me.
Cut out your printed and clear coated waterslide decals and cut them with as little extra material left on as possible. I was able to stay within about 1/16" of the printing all around. Don't leave long, thin areas though (like the bottom of the "F" or top of the "d" above). Leave a little material around them so they don't fold and twist like plastic wrap always seems to do.
Put the decal in a shallow pan of warm water for a minute or two. While it's soaking clean the surface it's going on. I use rubbing alcohol on a soft cotton rag or lint-free paper towel. When the decals paper backer is loose enough that you can start to slide the decal put the whole thing on your headstock, hold the decal with a finger tip and slide the backer out from under it. Position it just how you like it, press it in place a bit then dab it dry with a lint-free paper towel or cotton rag.
By the next day it's more than dry enough to clear coat over.


 Reply With Quote